The Cost of Repetitive Data Entry in Document Workflows
Anyone who has dealt with generating documents such as invoices, contracts, or reports understands the frustration of repeatedly typing the same customer or product information over and over. This repetitive data entry is not just tedious; it is a significant source of errors and wasted time. Professionals often spend hours re-entering details that should be readily accessible, slowing down the entire document creation process.
How Reusable Data Buckets Revolutionize Document Creation in 2026
The year 2026 brings solutions that leverage agentic and reusable data systems to eliminate this redundancy. At the forefront of this innovation is DocMiral’s Buckets. These are named, reusable data stores that hold essential information—such as customers, products, and company details—that can be accessed across templates and document types.
Introducing DocMiral Buckets: Your Data, Smarter and Always Ready
DocMiral Buckets enable template creators and document users to store structured data separately from templates. This means once a customer’s information is stored in a bucket, it can be auto-filled into any document template without repeatedly typing or manual lookups.
Creating Named Data Stores
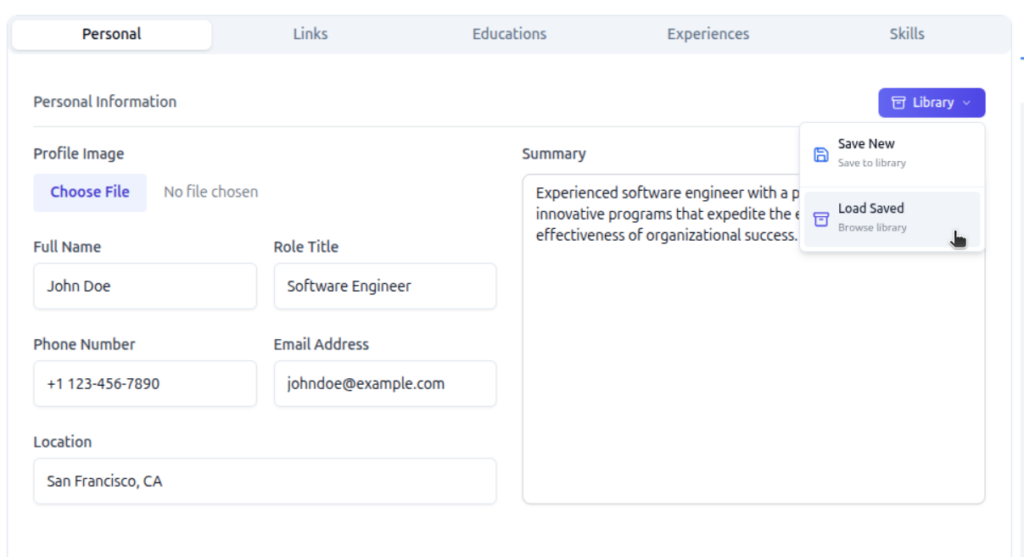
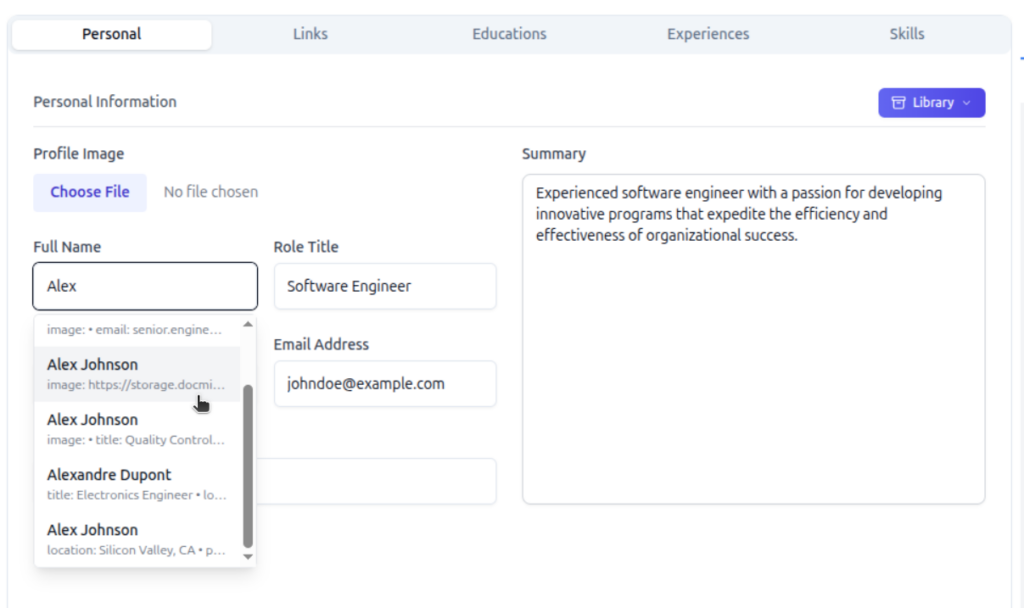
Buckets are organized by types such as customers, products, and company info. You can create and manage these buckets from your profile or on each section in document builder (library button), defining the fields relevant to each data set such as name, address, contact details for customers, or SKU, price for products.
Autocomplete and Intelligent Lookup in Document Forms
When filling in a document, DocMiral’s form UI offers intelligent autocomplete suggestions from these buckets. Start typing a customer name, and the system suggests matches, populated with all corresponding information fetched automatically. This is powered by TARS AI lookup integration, which intelligently retrieves and populates fields based on context.
Saving Document Data Back to Buckets
As you generate documents, any new or updated customer or product data entered can be saved back to the appropriate bucket. This creates a continuous feedback loop ensuring your reusable data buckets stay current and synchronized with your workflow.
Workflow in Action: Build Once, Reuse Everywhere
Imagine building an invoice for your customer once and saving that customer’s data in a bucket. The next time you create any document involving that customer, all information auto-fills instantly, eliminating repetitive input.
This streamlined approach can save you 15+ hours per week in document generation alone, freeing time for higher-value work and reducing error risks.
Getting Started: Create Your First Bucket Today
Ready to stop re-typing customer info and embrace the future of document automation? Define your data fields, add your entries, and watch the magic of seamless reuse across templates and workflows.
Say goodbye to repetitive typing, and hello to smarter document workflows in 2026.
Agentic AI Document Automation: What Changes in 2026 (And How to Use It)
The landscape of document automation is on the cusp of a significant transformation. As we enter 2026, the traditional focus on data extraction is shifting dramatically towards advanced reasoning and agentic workflows. This evolution allows for autonomous, end-to-end document processes that are smarter, more flexible, and far more intuitive.
From Data Extraction to Agentic Reasoning
For years, document automation centered on extracting data points from forms, PDFs, or unstructured text—an essential but limited capability. In 2026, the paradigm shifts as multi-layered AI systems replace monolithic tools. These systems not only parse data but understand context, reason through complex instructions, and autonomously execute tasks without manual intervention.
This agentic approach combines multiple AI components working collaboratively in layers, including chat interfaces, smart template builders, and contextual file parsing with reasoning capabilities. The goal is a seamless, dynamic workflow where users can interact in natural language, and the AI interprets, adapts, and generates documents accordingly.
DocMiral’s TARS: The Embodiment of Agentic AI
DocMiral’s TARS is uniquely positioned at the forefront of this transformation. As an agentic AI engine, TARS integrates chat-based template editing and customization, Smart Builder layers for structured design, and advanced file parsing with reasoning to deliver sophisticated document automation workflows.
Key Use Cases with TARS Agentic Features
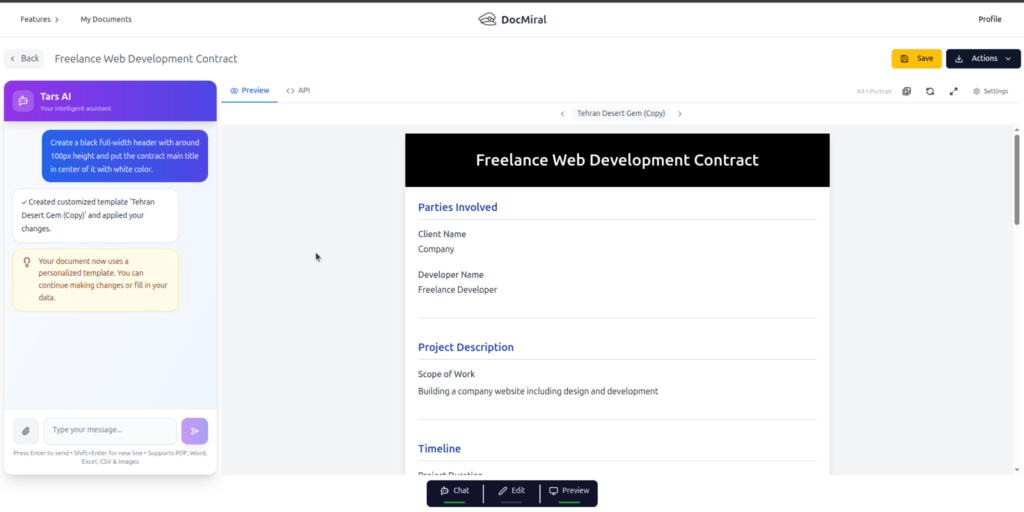
Chat to edit design and data: Users can simply instruct TARS, “Make the header dark blue and add skills from this CV,” and the AI applies precise changes without manual coding or template rebuilding.
Combining fill and customize intents: TARS understands both the intent to fill data and to customize layout or styling simultaneously, bridging gaps traditional tools can’t handle without complex workflows.
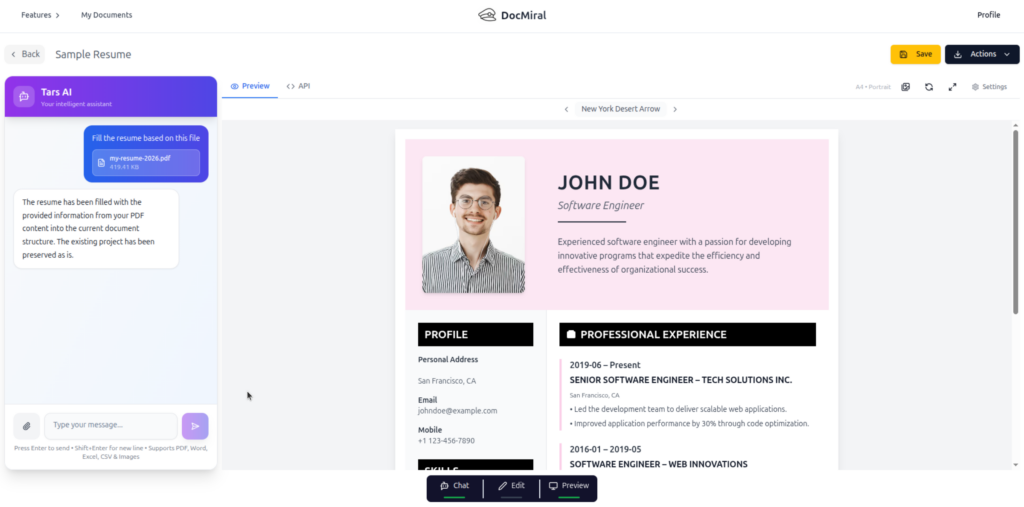
Context-aware changes via attachments: By attaching PDFs or images, users provide context for TARS to reason over. For instance, uploading a CV lets TARS extract relevant skills and integrate them into an existing document design dynamically.
Benefits Over Traditional Automation Tools
Agentic AI workflows, as embodied by TARS, are revolutionizing document automation with several clear advantages:
Surgical patches versus full rewrites: Instead of rebuilding whole templates for minor edits or new data points, TARS applies precise, context-aware patches, saving time and reducing errors.
Governance through Buckets: Data libraries called Buckets allow for reusable, governed, and structured inputs that maintain compliance and consistency across automated documents.
Natural interaction and reduced complexity: Users interact in simple language instead of complex scripting or template languages, making automation accessible beyond developers and designers.
Example Scenario: “Make Header Light Blue”
This typical instruction showcases the agentic power of TARS. The user chats with the AI, attaches a CV PDF, and requests specific styling changes plus data extraction and insertion. TARS parses the CV, extracts skill information, updates the document header’s color, and injects the skills into the appropriate section of the document—all in one seamless workflow.
Why 2026 is the Pivot Year for Document Automation
Several converging trends make 2026 a watershed moment:
AI models have matured to reliably perform reasoning tasks over complex documents.
Hybrid AI architectures combining chat, parsing, and smart builders have become production-ready.
User expectations demand more intuitive and autonomous document processes.
Organizations face pressure for governance, speed, and customization without increasing operational overhead.
Agentic AI meets these demands by moving beyond extraction to context-rich, autonomous document generation and management.
Get Started with Agentic Document Automation Today
DocMiral invites you to experience the future now by chatting with TARS inside the Entity Builder. Explore how agentic AI can transform your document workflows, reducing complexity, boosting agility, and maintaining full governance.
The 2026 No-Code and Agentic AI Boom: A New Era for Document Generation
As we enter 2026, the landscape of no-code platforms is undergoing a major transformation fueled by agentic AI capabilities. No longer limited to simple automation akin to Zapier’s triggers and actions, the new standard is prompt-to-document creation — an intelligent, dynamic process that generates complex documents directly from natural language inputs.
This shift is revolutionizing how freelancers, startups, and professionals produce critical paperwork. Instead of assembling templates manually or writing code, users now rely on AI to understand their intent and deliver smart, fully formatted PDFs in moments.
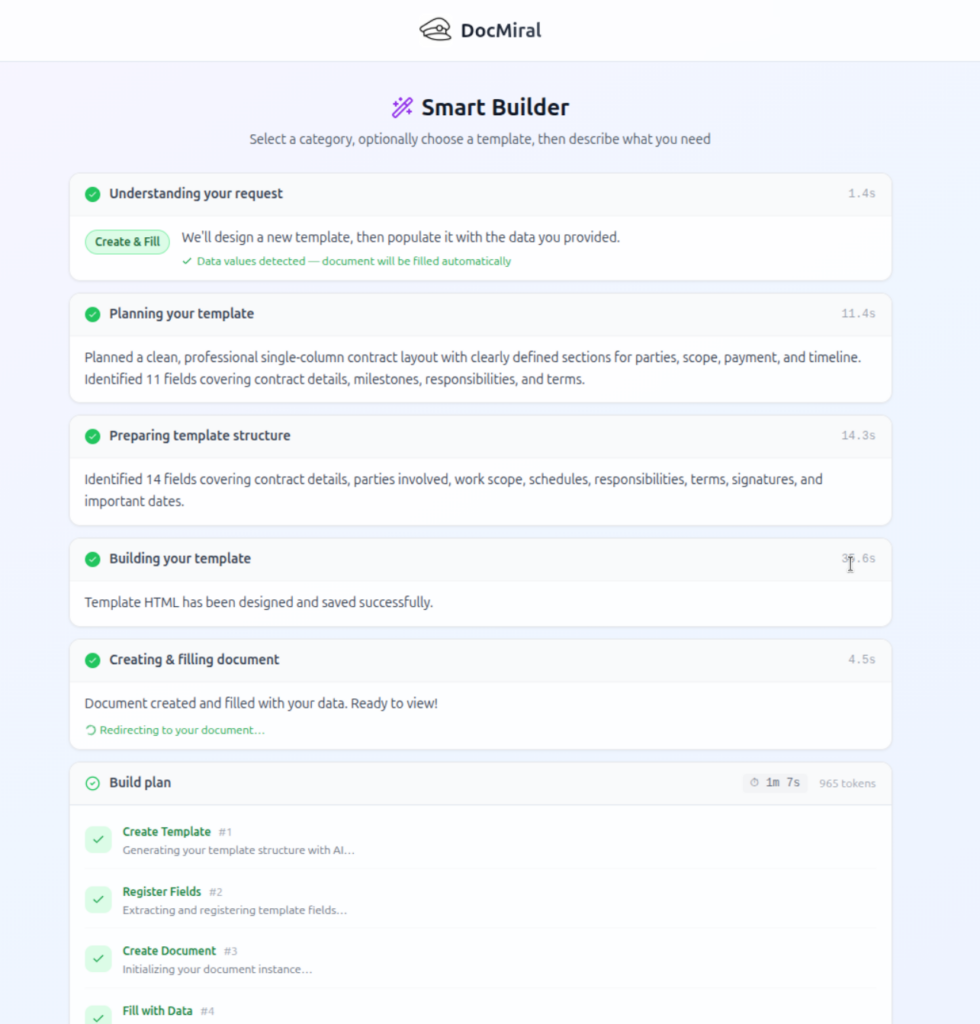
Introducing DocMiral’s Smart Builder: The Five-Layer Pipeline to Smart PDFs
At the forefront of this innovation is DocMiral’s Smart Builder, a no-code document generation engine built around a sophisticated five-layer pipeline:
Intent Detection: AI interprets the user’s prompt to understand the document type and purpose.
Field Extraction: Core data fields required for the document are identified and structured.
Variable Formatting: Data fields are formatted with context-aware styles such as date formats, currencies, and clause-specific variables.
AI-Driven Design with Tailwind CSS: An embedded AI applies responsive Tailwind CSS styles to craft professional layouts automatically.
Finalization and Data Fill: The document template is finalized and populated with the extracted and formatted variables, ready for download or further workflow integration.
Walkthrough: Generating a Freelance Contract from a Brief
Let’s consider a practical example: You want to generate a freelance contract from a simple brief prompt like “Generate a freelance contract from this brief.” Here’s how the Smart Builder handles it seamlessly:
Prompt Input: Enter the brief describing key contract terms such as project scope, payment terms, and deadlines.
File Attachments for Reference: You can attach sample documents or previous contracts for the AI to learn style and tone.
Template Cloning and Adaptation: The engine clones an existing freelance contract template and adapts it dynamically based on your prompt and attachments.
Review and Download: You receive a smart template and a document created based on that template ready to get output PDF contract, fully styled and containing all necessary clauses, which you can review, edit, or send for electronic signing.
No-Code Advantages Over Traditional HTML/Jinja2 Coding
No-code document generation with DocMiral’s Smart Builder offers several advantages over manual template coding using HTML or Jinja2:
Ease of Use: No need to know markup languages or templating syntax — intuitive prompt inputs are enough.
Speed: Documents are created in real-time with AI assistance, eliminating hours spent hand-coding templates.
Flexibility: AI adapts templates on the fly to fit varied user requirements, versus static coded templates requiring developer updates.
Design Automation: Styling is intelligent and responsive thanks to Tailwind CSS integration, without manual CSS tweaking.
Workflow Integration: Generated documents can seamlessly feed into e-signature apps, APIs, and automation without technical overhead.
Get Started with DocMiral’s Smart Builder Today
In 2026, prompt-to-document is setting a new productivity standard. DocMiral’s Smart Builder puts the power of AI-driven no-code document generation at your fingertips, making professional PDF creation accessible, efficient, and intelligent.
Explore the Smart Builder to create smart PDFs with minimal effort. Visit DocMiral to start your journey into the future of document automation.
In every professional setting, document workflows clutter our days with repetitive tasks: drafting invoices, compiling meeting minutes, issuing contracts, or preparing project proposals. These processes, while crucial, often consume valuable time that could be better spent on strategic work. Automating these document workflows can drastically improve efficiency, reduce errors, and ensure consistency.
In this post, we explore 10 common document workflows you can automate today using DocMiral, an AI-powered document creation platform tailored to streamline document generation and management. We’ll break down each type of document, illustrate the automation approach, and show how DocMiral’s features can optimize these workflows.
1. Invoices
Invoice creation follows predictable patterns: client details, list of services or products, amounts, taxes, and payment terms. Automating invoices saves hours of manual entry and minimizes errors.
Using DocMiral, you can create an HTML + TailwindCSS invoice template with dynamic variables for client data and line items. Integration with data Buckets allows for mapping product and pricing information automatically. With API calls, invoices generate instantly when a sale is recorded.
Employment contracts require customized clauses based on role, salary, and jurisdiction but follow a consistent structure. Automation reduces drafting time and standardizes employment terms.
DocMiral’s MiniApps can collect structured inputs (like position, salary, benefits), and AI-powered templates from Tars AI can generate contract drafts. Variables make it easy to customize terms, and the platform supports e-signature integration for a smooth execution.
Meeting minutes are essential for documentation and follow-up but often inconsistently formatted and delayed.
Leverage a reusable meeting minutes template with prebuilt sections for agenda, attendees, discussion points, decisions, and action items. Use DocMiral’s automation to populate attendee lists from Buckets and draft summaries using AI-powered suggestions from meeting transcripts uploaded via MiniApps.
Whether sales reports, status updates, or technical summaries, reports require consistent structure and accurate data integration.
DocMiral allows API-driven data insertion from databases or analytical tools, populating tables, charts, and insights automatically into HTML templates styled with TailwindCSS. This ensures reports are timely and visually coherent.
Recruiters and professionals want well-formatted resumes that highlight key skills and experiences.
With DocMiral, users can select from multiple resume templates, fill out MiniApps capturing structured resume data, and then generate polished PDF resumes instantly. Templates ensure branding consistency, and AI assistance helps optimize phrasing.
6. Quotations
Preparing quotations manually risks inconsistent pricing and delays.
Templates linked to Buckets containing price lists auto-fill costs and customizable terms. When combined with DocMiral’s automation, sales teams can generate quotes quickly from lead data, reducing turnaround time and errors.
7. Certificates
Certificates for courses, events, or achievements need personalized text and uniform design.
DocMiral supports dynamic generation of certificates, pulling recipient names and course details from Buckets. Templates define the visual design using TailwindCSS, ensuring a professional look for every certificate generated.
8. Project Proposals
Project proposals demand customization but reuse of core content and consistent formatting.
DocMiral’s modular templates enable insertion of client-specific variables, scope, timeline, and pricing details captured via MiniApps. Automated generation ensures proposals are ready faster, with fewer revisions.
9. Legal Letters
Legal correspondence often repeats core phrases and clauses tailored by case specifics.
Using prebuilt templates, DocMiral automates drafting by filling in party names, dates, and legal references from Buckets. AI assistance can help draft initial letter bodies based on context, speeding up legal workflow.
10. NDAs (Non-Disclosure Agreements)
NDAs require precise terms but need quick generation for many partners or vendors.
DocMiral templates enable rapid population of counterparty details and confidentiality clauses. Integration with e-signature apps makes execution seamless, closing contracts faster.
How DocMiral Brings It All Together
At the core, DocMiral integrates template design with data management and AI-driven generation. Key components beneficial to these workflows include:
Templates with HTML + TailwindCSS: Let you define flexible, visually consistent designs for all documents.
Buckets: Centralized reusable data libraries that feed document variables.
MiniApps: Structured data capture interfaces that standardize input before document generation.
AI Templates with Tars AI: Produce drafts and text expansions automatically, reducing manual writing.
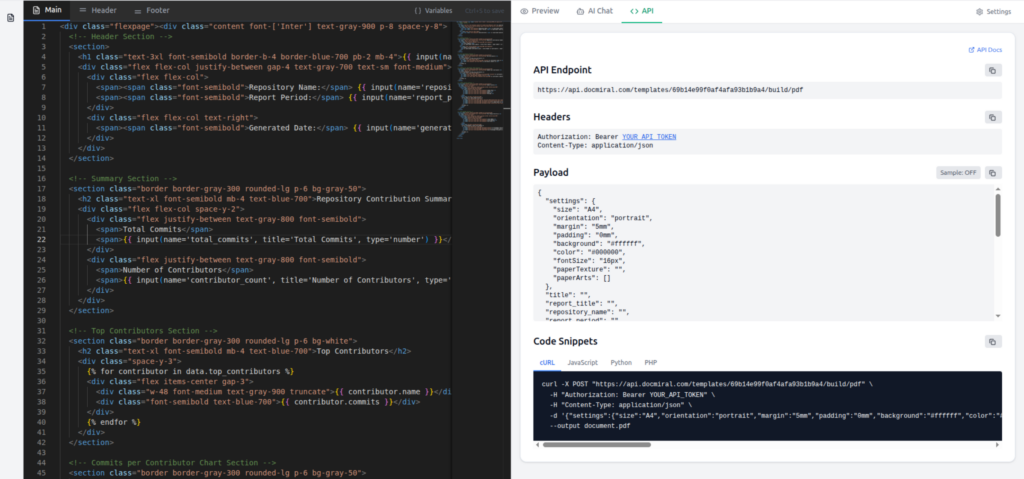
API & Automation: Connect your systems to trigger document generation and delivery seamlessly.
E-Signature Integration: Streamlines contract and agreement execution embedded within the workflow.
By combining these capabilities, DocMiral transforms tedious, error-prone manual drafting into automated, repeatable workflows. The platform is designed to serve both template creators (developers and designers who build these document systems) and end users (professionals who generate documents). It fosters consistency, speeds turnaround, and reduces operational overhead.
Conclusion
Automating your document workflows is more than a productivity hack — it ensures accuracy, compliance, and professionalism in everyday business activities. The 10 document types discussed here are prime candidates for automation, delivering immediate value.
DocMiral equips you with the tools to build, customize, and automate these document workflows easily. With modular templates, reusable data, AI assistance, and seamless integrations, you can focus on what really matters: scaling your business and improving client experiences.
Creating powerful templates in DocMiral is not just about design. The real magic happens when your template becomes dynamic — able to accept data, adapt to users, and generate documents automatically.
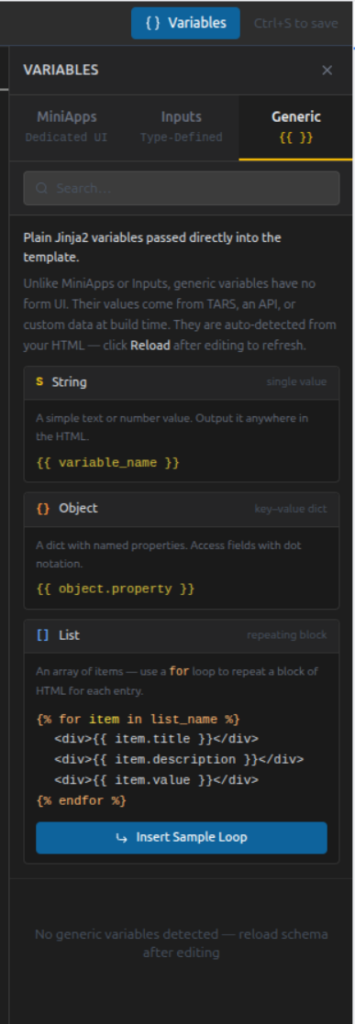
To make this possible, DocMiral templates support three types of variables. Each serves a different purpose and gives you a different level of control.
In this guide, you will learn when and how to use:
MiniApp Fields
Type Defined Fields
Generic Fields
You do not need to understand backend data structures or schemas. Everything here focuses on what matters to template creators: writing templates effectively.
The Big Picture
Think of template variables as three levels of intelligence:
Variable Type
Best For
UI Support
Complexity
MiniApp Fields
Structured sections
Dedicated UI
Advanced
Type Defined Fields
Single controlled inputs
Built-in field UI
Medium
Generic Fields
Flexible API data
No UI required
Simple
Choose the one that matches how structured your data needs to be.
1. MiniApp Fields (Structured Sections)
MiniApps are the most powerful type of variable.
They connect your template to a dedicated editing interface designed for a specific document section.
Instead of manually defining many fields, you reference a ready-made data editor.
When to Use MiniApps
Use MiniApps when:
A section has multiple related fields
Users need a guided UI
Data may repeat (lists)
The structure is reusable across templates
Typical examples:
Resume personal details
Work experiences
Education history
Invoice items
Inspection reports
Accessing MiniApp Data
MiniApp fields use the mini() directive.
Object Example
{{ mini(name='resumes/personal', key='name') }}
This pulls a single value from the Resume Personal MiniApp.
Example output:
John Doe
List Example
MiniApps can also return lists.
{% for item in mini(
    name="resumes/experiences",
    items=["title", "company", "date_start", "date_end"]
) %}
If you work in UK construction, you already know this:
CIS mistakes are expensive.
One wrong calculation, one incorrect VAT base, one unclear labour/material split — and suddenly you’re dealing with rejected payments, accountant queries, or HMRC issues.
This guide explains everything you need to know about CIS invoices in the UK, including:
What a CIS invoice actually is
What HMRC expects
How CIS deduction is calculated
How VAT interacts with CIS
Common mistakes to avoid
What a fully compliant CIS invoice should contain
And at the end, you’ll see how to generate one properly without guesswork.
What Is a CIS Invoice?
A CIS invoice is a construction invoice issued under the UK Construction Industry Scheme (CIS).
Under CIS:
The contractor deducts tax from a subcontractor’s labour payment
The deduction is sent to HMRC
The subcontractor receives the net amount
Important:
CIS is not VAT. CIS is not a separate tax. It is a tax withholding mechanism.
The invoice must clearly support this deduction structure.
Who Needs a CIS-Compliant Invoice?
You need one if you are:
A subcontractor invoicing a contractor under CIS
A contractor reviewing and paying CIS invoices
An accountant preparing CIS-compliant documentation
A limited company or sole trader in construction
If you issue standard invoices without separating labour and materials, your invoice is not truly CIS-safe.
How CIS Deduction Works (The Core Rule)
CIS deduction applies only to:
Labour
Plant hire with operator
It does NOT apply to:
Materials
VAT
Most travel expenses
Plant hire without operator
The formula:
CIS deduction = Labour subtotal (ex VAT) × CIS rate
Rates are:
0% – Gross payment status
20% – Verified subcontractor
30% – Unverified subcontractor
CIS status belongs to the subcontractor (verified via UTR), not the invoice.
How VAT Works with CIS
This is where most people make mistakes.
CIS is calculated:
On labour only
Excluding VAT
Excluding materials
VAT is calculated separately and added afterward.
Correct order:
Calculate labour subtotal (ex VAT)
Apply CIS deduction to labour only
Calculate VAT on VATable items
Calculate total
Subtract CIS deduction
If you apply CIS to VAT-inclusive totals, it’s wrong.
What a Proper CIS Invoice Must Include
A compliant invoice should contain:
Subcontractor details
Legal name
Address
UTR
VAT number (if registered)
CIS status
Contractor details
Legal name
Address
Invoice details
Invoice number
Invoice date
Work period
Project/site reference
Financial breakdown
Labour subtotal (ex VAT)
Materials subtotal (ex VAT)
CIS rate
CIS deduction amount
VAT amount
Total including VAT
Net payable
If any of these are missing, accountants will ask questions.
Example: What a Structured CIS Invoice Looks Like
[INSERT IMAGE HERE – Screenshot of the app summary section]
Use your full-page screenshot and crop around:
Labour subtotal
Materials subtotal
CIS deduction line
VAT breakdown
Net payable
This visual reinforces the structured breakdown.
Alt text suggestion:
Example of CIS-compliant invoice breakdown with labour subtotal, CIS deduction, VAT and net payable
Common CIS Invoice Mistakes
These are the most frequent problems:
Applying CIS to materials
Applying CIS to VAT
Not separating labour clearly
Not showing CIS rate
Missing UTR
Using generic invoice templates
These mistakes delay payment more often than people realise.
Why Generic Invoice Templates Are Risky
Standard invoice templates:
Do not enforce labour classification
Do not enforce CIS logic
Allow manual override of totals
Do not show CIS base clearly
A CIS invoice should not be manually calculated every time.
It should be deterministic.
How to Generate a CIS-Compliant Invoice Properly
Instead of using spreadsheets or modifying a generic invoice template, you can use a dedicated CIS invoice generator.