Category: Template – Code Studio

  • 10 Document Workflows You Can Automate Today

    different-documents-automation

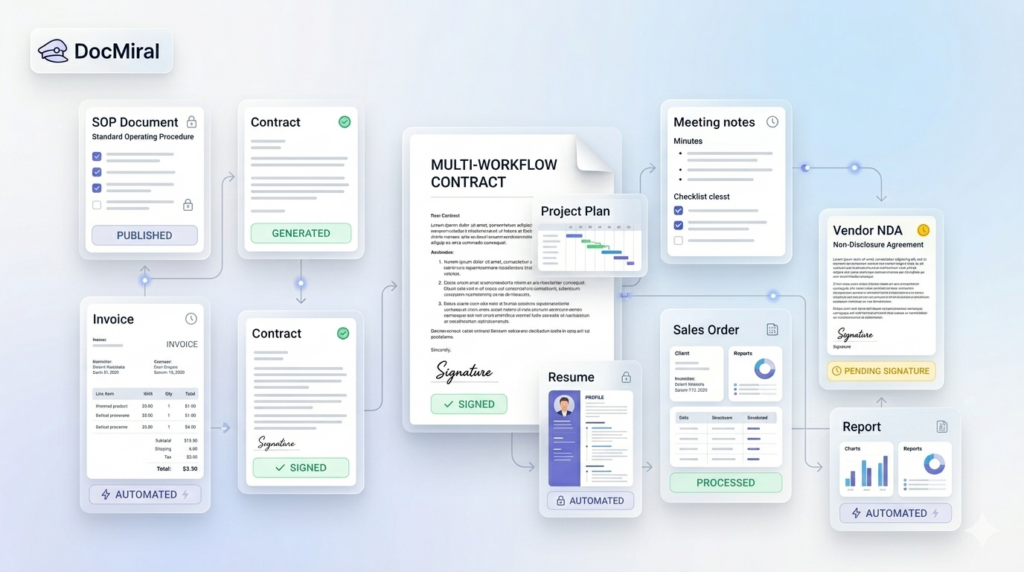
    In every professional setting, document workflows clutter our days with repetitive tasks: drafting invoices, compiling meeting minutes, issuing contracts, or preparing project proposals. These processes, while crucial, often consume valuable time that could be better spent on strategic work. Automating these document workflows can drastically improve efficiency, reduce errors, and ensure consistency.

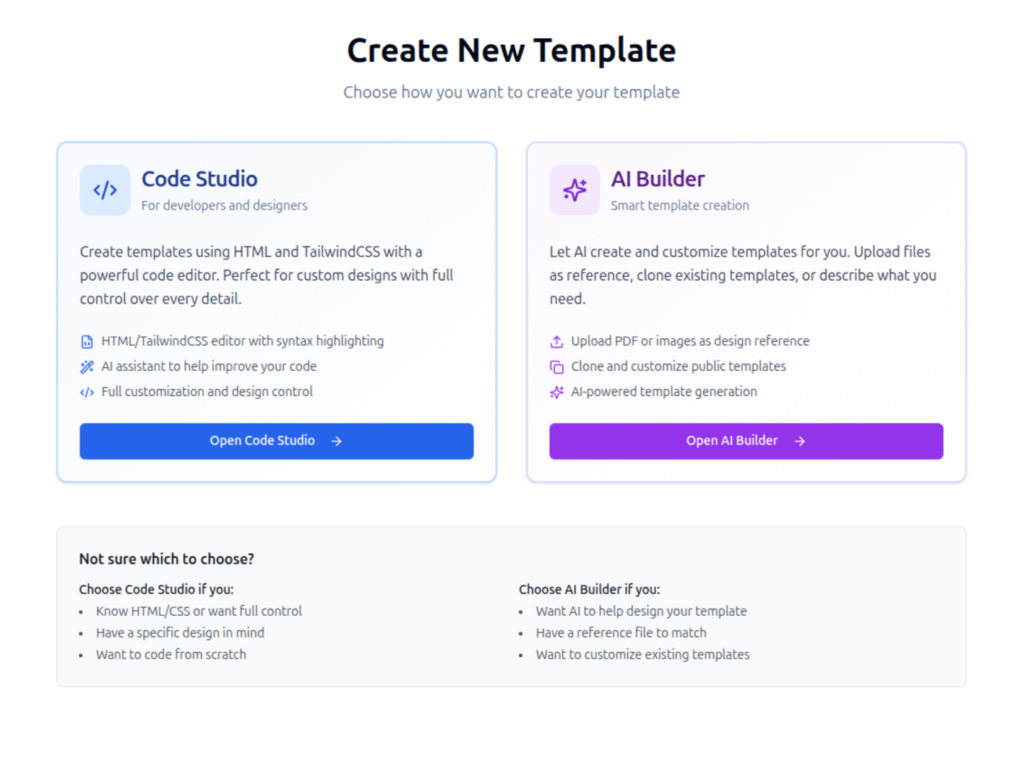
    In this post, we explore 10 common document workflows you can automate today using DocMiral, an AI-powered document creation platform tailored to streamline document generation and management. We’ll break down each type of document, illustrate the automation approach, and show how DocMiral’s features can optimize these workflows.

    1. Invoices

    Invoice creation follows predictable patterns: client details, list of services or products, amounts, taxes, and payment terms. Automating invoices saves hours of manual entry and minimizes errors.

    Using DocMiral, you can create an HTML + TailwindCSS invoice template with dynamic variables for client data and line items. Integration with data Buckets allows for mapping product and pricing information automatically. With API calls, invoices generate instantly when a sale is recorded.

    2. Employment Contracts

    Employment contracts require customized clauses based on role, salary, and jurisdiction but follow a consistent structure. Automation reduces drafting time and standardizes employment terms.

    DocMiral’s MiniApps can collect structured inputs (like position, salary, benefits), and AI-powered templates from Tars AI can generate contract drafts. Variables make it easy to customize terms, and the platform supports e-signature integration for a smooth execution.

    3. Meeting Minutes

    Meeting minutes are essential for documentation and follow-up but often inconsistently formatted and delayed.

    Leverage a reusable meeting minutes template with prebuilt sections for agenda, attendees, discussion points, decisions, and action items. Use DocMiral’s automation to populate attendee lists from Buckets and draft summaries using AI-powered suggestions from meeting transcripts uploaded via MiniApps.
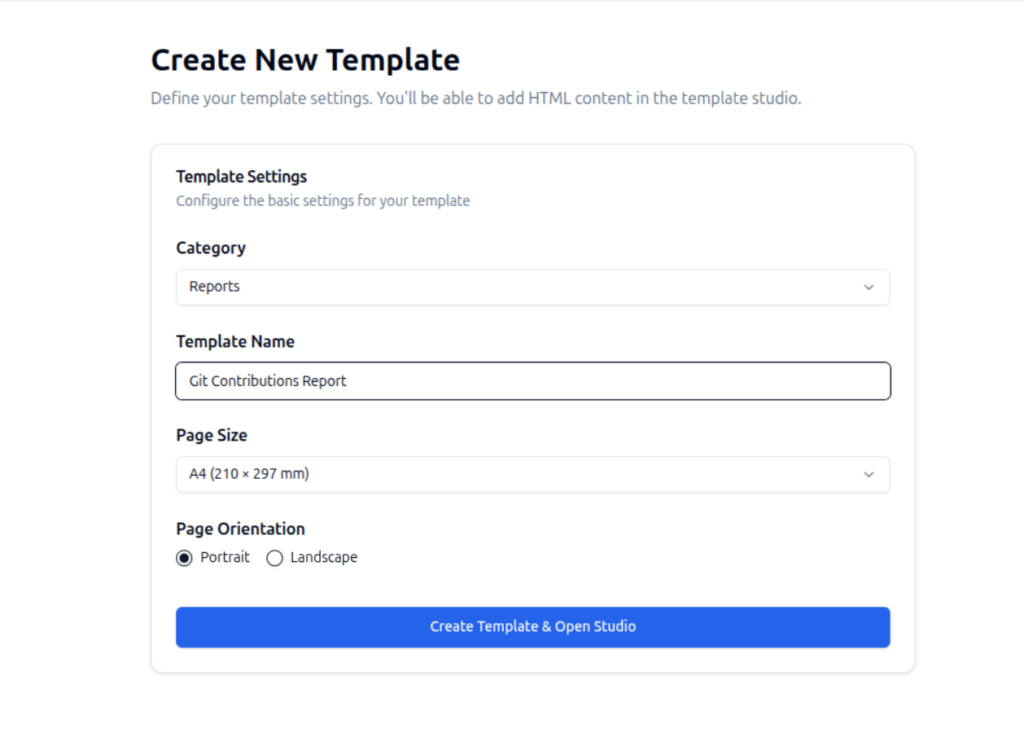
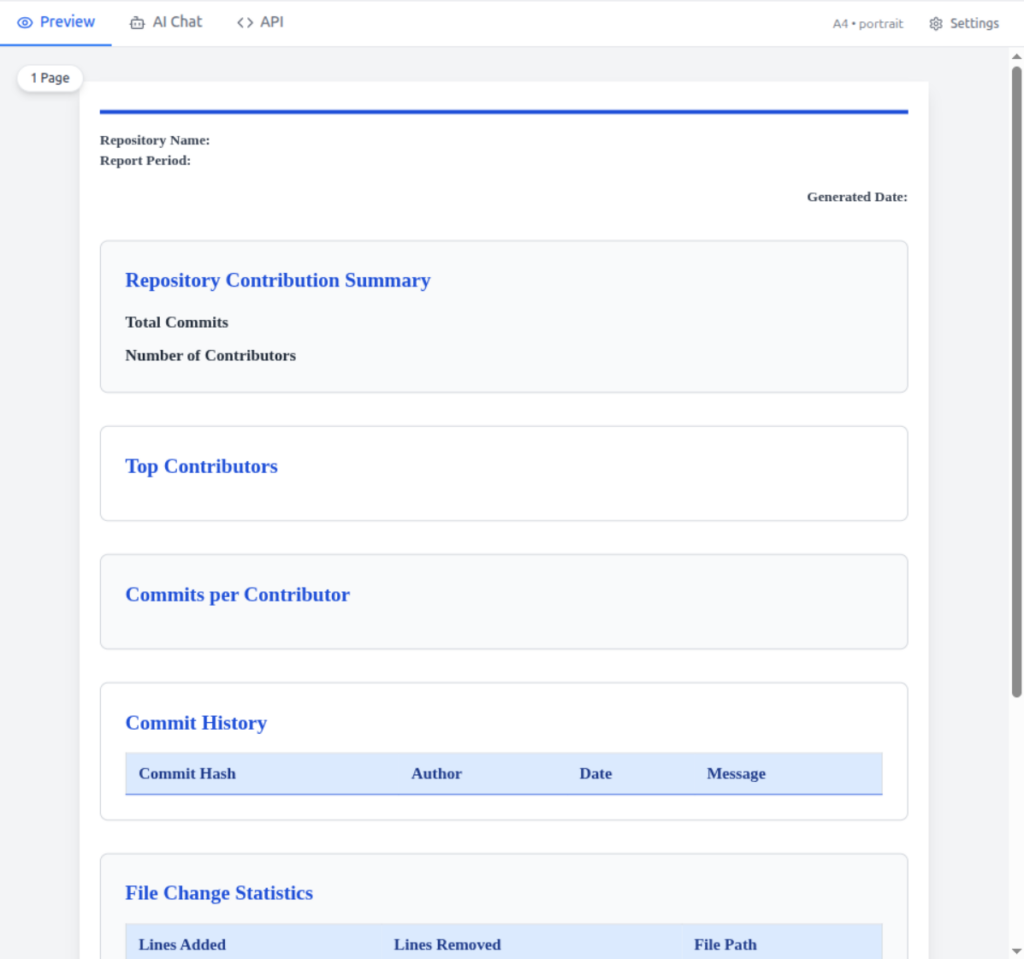
    4. Reports

    Whether sales reports, status updates, or technical summaries, reports require consistent structure and accurate data integration.

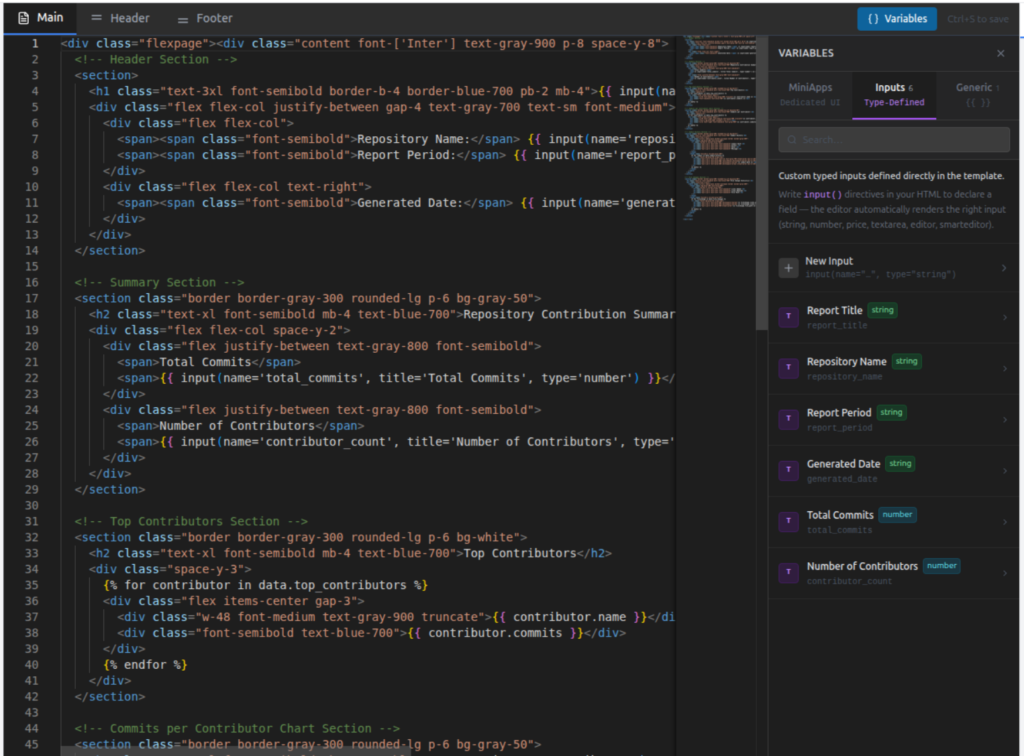
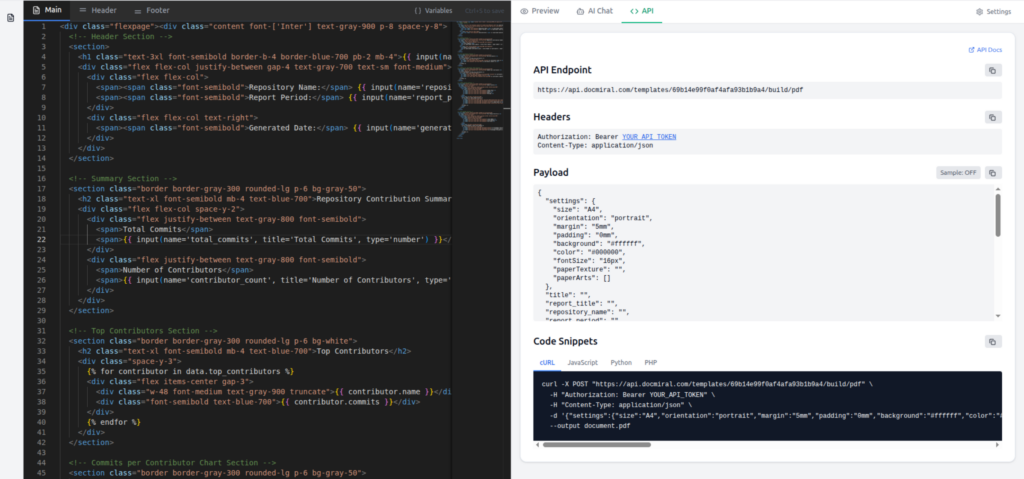
    DocMiral allows API-driven data insertion from databases or analytical tools, populating tables, charts, and insights automatically into HTML templates styled with TailwindCSS. This ensures reports are timely and visually coherent.

    5. Resumes

    Recruiters and professionals want well-formatted resumes that highlight key skills and experiences.

    With DocMiral, users can select from multiple resume templates, fill out MiniApps capturing structured resume data, and then generate polished PDF resumes instantly. Templates ensure branding consistency, and AI assistance helps optimize phrasing.

    6. Quotations

    Preparing quotations manually risks inconsistent pricing and delays.

    Templates linked to Buckets containing price lists auto-fill costs and customizable terms. When combined with DocMiral’s automation, sales teams can generate quotes quickly from lead data, reducing turnaround time and errors.

    7. Certificates

    Certificates for courses, events, or achievements need personalized text and uniform design.

    DocMiral supports dynamic generation of certificates, pulling recipient names and course details from Buckets. Templates define the visual design using TailwindCSS, ensuring a professional look for every certificate generated.

    8. Project Proposals

    Project proposals demand customization but reuse of core content and consistent formatting.

    DocMiral’s modular templates enable insertion of client-specific variables, scope, timeline, and pricing details captured via MiniApps. Automated generation ensures proposals are ready faster, with fewer revisions.

    9. Legal Letters

    Legal correspondence often repeats core phrases and clauses tailored by case specifics.

    Using prebuilt templates, DocMiral automates drafting by filling in party names, dates, and legal references from Buckets. AI assistance can help draft initial letter bodies based on context, speeding up legal workflow.

    10. NDAs (Non-Disclosure Agreements)

    NDAs require precise terms but need quick generation for many partners or vendors.

    DocMiral templates enable rapid population of counterparty details and confidentiality clauses. Integration with e-signature apps makes execution seamless, closing contracts faster.

    How DocMiral Brings It All Together

    At the core, DocMiral integrates template design with data management and AI-driven generation. Key components beneficial to these workflows include:

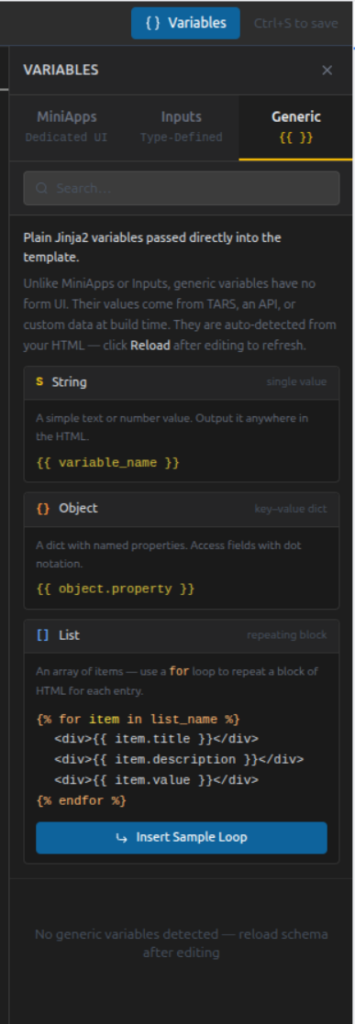
    • Templates with HTML + TailwindCSS: Let you define flexible, visually consistent designs for all documents.
    • Buckets: Centralized reusable data libraries that feed document variables.
    • MiniApps: Structured data capture interfaces that standardize input before document generation.
    • AI Templates with Tars AI: Produce drafts and text expansions automatically, reducing manual writing.
    • API & Automation: Connect your systems to trigger document generation and delivery seamlessly.
    • E-Signature Integration: Streamlines contract and agreement execution embedded within the workflow.

    By combining these capabilities, DocMiral transforms tedious, error-prone manual drafting into automated, repeatable workflows. The platform is designed to serve both template creators (developers and designers who build these document systems) and end users (professionals who generate documents). It fosters consistency, speeds turnaround, and reduces operational overhead.

    Conclusion

    Automating your document workflows is more than a productivity hack — it ensures accuracy, compliance, and professionalism in everyday business activities. The 10 document types discussed here are prime candidates for automation, delivering immediate value.

    DocMiral equips you with the tools to build, customize, and automate these document workflows easily. With modular templates, reusable data, AI assistance, and seamless integrations, you can focus on what really matters: scaling your business and improving client experiences.

  • Build Your First Dynamic Document Template Using HTML + Tailwind

    A step-by-step tutorial for creating your first DocMiral template.


    Introduction

    Developers often generate documents using a mix of:

    • HTML-to-PDF libraries
    • static PDF templates
    • server-side string replacements
    • fragile table layouts

    This works at first, but quickly becomes difficult when documents become dynamic.

    For example, imagine generating:

    • invoices
    • reports
    • resumes
    • contracts
    • meeting minutes

    These documents usually contain:

    • repeating sections (tables, lists)
    • optional blocks
    • dynamic values
    • different layouts depending on data

    Modern document platforms solve this problem by turning documents into dynamic templates.

    Instead of generating PDFs manually, you create HTML templates with placeholders, then inject data using APIs.

    In this tutorial you’ll learn how to create your first dynamic document template using HTML + TailwindCSS in DocMiral.

    We’ll build a Git Contributions Report template step-by-step and connect it to the API.


    What Is DocMiral?

    DocMiral is a document automation platform that allows developers to:

    • design document templates with HTML + TailwindCSS
    • add dynamic variables
    • generate documents using APIs
    • automate document workflows

    Templates can include:

    • Typed Inputs — structured fields (text, numbers, images, charts)
    • Generic Variables — flexible data structures
    • MiniApps — structured UI components for complex sections

    These variables automatically generate a schema used when building documents through the API.

    Read More About DocMiral Supported Variables


    Step 1 — Create a New Template

    First open the Template Creator.

    Here you can choose between two creation modes:

    • Code Studio — build templates manually using HTML and TailwindCSS
    • AI Builder — describe the template and let AI generate it

    For developers, Code Studio gives full control.

    docmiral-create-template-using-code-or-ai-assistant
    Choose Creating Template Type

    This screen appears when creating a new template.

    Click Open Code Studio.


    Step 2 — Define Template Settings

    Before opening the editor you define basic template settings:

    • category
    • template name
    • page size
    • page orientation

    For this tutorial we create:

    Template name: Git Contributions Report

    Category: Reports

    Page size: A4

    Orientation: Portrait

    docmiral-create-template-using-code

    After clicking Create Template & Open Studio, the template editor opens.


    Step 3 — Understanding the Template Studio

    The Template Studio contains several important panels.

    docmiral-create-template-code-studio
    DocMiral – Code Studio

    Key areas:

    1. Code Editor

    Write your template using:

    HTML
    TailwindCSS
    Jinja2 templating

    2. Live Preview

    Displays the rendered document in real time.

    3. Variables Panel

    Shows detected variables from your template.

    4. API Tab

    Displays the API endpoint and schema for generating documents.

    5. AI Chat

    Allows AI to help modify templates.


    Step 4 — Start With a Flexible Page

    DocMiral supports two page types:

    Fixed Page

    <div class="page">

    Used for precise layouts.

    Flexible Page

    <div class="flexpage">

    Used for documents with dynamic length.

    Our report uses a flexible page.

    Start the template with:

    <div class="flexpage">
    <div class="content">
    <!-- Your template content goes here -->
    </div>
    </div>

    Step 5 — Add Typed Inputs

    Typed inputs are structured variables declared directly inside the template.

    Example:

    {{ input(name='report_title', title='Report Title', type='string') }}

    This automatically creates:

    • a field in the editor UI
    • a schema entry
    • a variable accessible in the template

    Supported types include:

    • string (Normal input text)
    • number
    • Date
    • price (formatted like price)
    • textarea (Multi-line text like a personal summary box)
    • editor (A text area with editor-formatting capabilities)
    • smarteditor (An editor with text-template features)
    • image
    • qrcode
    • barcode
    • chart


    Example inside the header:
    <h1 class="text-3xl font-semibold border-b-4 border-blue-700 pb-2 mb-4">
    {{ input(name='report_title', title='Report Title', type='string') }}
    </h1>

    This creates a field called Report Title.

    docmiral-code-studio-typed-input-variables
    Defined (used in template code) Typed Inputs

    The variables panel automatically lists these inputs.


    Step 6 — Use Generic Data Variables

    Not all document data should be predefined fields.

    Sometimes you want flexible data structures like:

    • lists
    • objects
    • arrays

    These are handled using Jinja2 variables.

    Example:

    {{ data.repository_name }}

    Lists can be rendered using loops:

    {% for contributor in data.top_contributors %}
    <div>{{ contributor.name }}</div>
    {% endfor %}

    DocMiral automatically detects these variables and includes them in the template schema.

    docmiral-code-studio-generic-variables
    Code Studio – Generic Inputs Hints – (HowTo Use)

    Step 7 — Create Dynamic Lists

    The Git report includes dynamic sections such as:

    Top Contributors

    {% for contributor in data.top_contributors %}
    <div class="flex items-center gap-3">
    <div class="w-48 font-medium text-gray-900 truncate">
    {{ contributor.name }}
    </div> <div class="font-semibold text-blue-700">
    {{ contributor.commits }}
    </div>
    </div>
    {% endfor %}

    This loop generates one row per contributor.

    Example input data:

    top_contributors
    - Alice (45 commits)
    - Bob (32 commits)
    - Daniel (27 commits)

    Step 8 — Build Dynamic Tables

    Dynamic tables are common in documents.

    Example for commit history:

    {% for commit in data.commit_history %}
    <tr>
    <td>{{ commit.hash }}</td>
    <td>{{ commit.author }}</td>
    <td>{{ commit.date }}</td>
    <td>{{ commit.message }}</td>
    </tr>
    {% endfor %}

    Each item becomes a row.

    This makes templates flexible for any dataset size.


    Step 9 — Preview the Template

    While editing, the Preview panel renders the template.

    docmiral-code-studio-preview-section

    This helps you verify:

    • spacing
    • typography
    • layout
    • dynamic sections

    Since DocMiral uses TailwindCSS, styling is applied directly through utility classes.


    Step 10 — View the Generated Schema

    After creating variables, DocMiral generates a schema used by the API.

    Example schema snippet:

    {
      "report_title": "",
      "repository_name": "",
      "report_period": "",
      "generated_date": "",
      "total_commits": 0,
      "contributor_count": 0,
      "data": {
        "top_contributors": [
          {
            "name": "",
            "commits": ""
          }
        ],
        
        ...
    
      }
    }

    This schema defines the expected input when generating documents.


    Step 11 — Generate Documents Using the API

    DocMiral automatically exposes an API endpoint for each template.

    Example endpoint:

    POST
    https://api.docmiral.com/templates/{template_id}/build/pdf

    docmiral-code-studio-apibox
    Create document (PDF/Image/Powepoint) using API

    Example request:

    curl -X POST \
    https://api.docmiral.com/templates/{template_id}/build/pdf \
    -H "Authorization: Bearer YOUR_API_TOKEN" \
    -H "Content-Type: application/json"

    Payload example:

    {
    "report_title": "Git Contributions Report",
    "repository_name": "docmiral/api",
    "report_period": "Jan – Mar 2026",
    "generated_date": "2026-03-10",
    "total_commits": 143,
    "contributor_count": 7
    }

    The API generates a fully rendered PDF document.


    Best Practices for Template Design

    When creating templates:

    Use Flex Layouts

    Avoid rigid layouts that break with dynamic data.

    Prefer Flexible Pages

    flexpage

    is best for most documents that have no pre-defined length.

    Keep Sections Modular

    Break documents into sections like:

    • header
    • summary
    • tables
    • charts

    Avoid Hardcoded Values

    Always use variables for data that might change.


    Conclusion

    Building document templates doesn’t need to be complicated.

    With DocMiral you can:

    • design documents using HTML + TailwindCSS
    • add dynamic variables
    • support complex data structures
    • generate documents through APIs

    The workflow becomes:

    Design template → define variables → call API → generate documents

    Once you understand this pattern, you can build templates for almost anything:

    • invoices
    • resumes
    • contracts
    • reports
    • certificates
    • proposals

    And because templates are just HTML, developers can work with them using familiar tools.

  • How to Add Variables to Your DocMiral Templates (Complete Guide for Creators)

    Creating powerful templates in DocMiral is not just about design. The real magic happens when your template becomes dynamic — able to accept data, adapt to users, and generate documents automatically.

    To make this possible, DocMiral templates support three types of variables. Each serves a different purpose and gives you a different level of control.

    In this guide, you will learn when and how to use:

    • MiniApp Fields
    • Type Defined Fields
    • Generic Fields

    You do not need to understand backend data structures or schemas. Everything here focuses on what matters to template creators: writing templates effectively.


    The Big Picture

    Think of template variables as three levels of intelligence:

    Variable TypeBest ForUI SupportComplexity
    MiniApp FieldsStructured sectionsDedicated UIAdvanced
    Type Defined FieldsSingle controlled inputsBuilt-in field UIMedium
    Generic FieldsFlexible API dataNo UI requiredSimple

    Choose the one that matches how structured your data needs to be.


    1. MiniApp Fields (Structured Sections)

    MiniApps are the most powerful type of variable.

    They connect your template to a dedicated editing interface designed for a specific document section.

    Instead of manually defining many fields, you reference a ready-made data editor.

    When to Use MiniApps

    Use MiniApps when:

    • A section has multiple related fields
    • Users need a guided UI
    • Data may repeat (lists)
    • The structure is reusable across templates

    Typical examples:

    • Resume personal details
    • Work experiences
    • Education history
    • Invoice items
    • Inspection reports

    Accessing MiniApp Data

    MiniApp fields use the mini() directive.


    Object Example

    {{ mini(name='resumes/personal', key='name') }}

    This pulls a single value from the Resume Personal MiniApp.

    Example output:

    John Doe

    List Example

    MiniApps can also return lists.

    {% for item in mini(
    name="resumes/experiences",
    items=["title", "company", "date_start", "date_end"]
    ) %}

    Inside the loop:

    {{ item.title }}
    {{ item.company }}
    {{ item.date_start }}
    {{ item.date_end }}

    This automatically renders multiple experience entries added by the user.


    Why MiniApps Are Powerful

    You get:

    • Structured editing UI
    • Consistent data format
    • Cleaner templates
    • Reusable sections across templates

    Instead of designing inputs yourself, you reuse intelligent components.


    2. Type Defined Fields (Smart Inputs)

    Sometimes you only need one field, not a full MiniApp.

    That’s where Type Defined Fields come in.

    They allow you to declare a field and specify how it should behave.


    Using the text() Directive

    Example:

    {{ text(
    name='agreement_text',
    title='Agreement Text',
    type='smarteditor'
    ) }}

    This creates:

    • A named variable
    • A labeled input
    • A specific editor type

    When to Use Type Defined Fields

    Use them for:

    • Agreements
    • Descriptions
    • Notes
    • Custom paragraphs
    • Checkboxes
    • Dates
    • Dropdown selections

    Essentially, any single configurable input.


    Benefits

    • No UI coding required
    • Consistent input behavior
    • Cleaner creator experience
    • Controlled data format

    You define intent, DocMiral handles the interface.


    3. Generic Fields (Pure Template Variables)

    Generic fields are the simplest and most flexible option.

    They use standard Jinja-style variables.

    Perfect for:

    • API users
    • Automation workflows
    • Fully custom data sources

    Simple Variables

    {{ name }}

    or nested:

    {{ client.name }}

    Lists

    {% for item in items %}
    {{ item }}
    {% endfor %}

    Complex Example

    {% set result = data.report_info.inspection_result|lower %}
    <span class="
    {% if result == 'pass' %} bg-green-600
    {% elif result == 'hold' %} bg-yellow-500
    {% elif result == 'fail' %} bg-red-600
    {% else %} bg-gray-500
    {% endif %}
    ">
    {{ data.report_info.inspection_result }}
    </span>

    This allows full logic control inside templates.


    When to Use Generic Fields

    Choose generic fields when:

    • Data comes from APIs
    • You want maximum flexibility
    • No built-in UI is required
    • You already control the data structure

    They are especially popular among developers integrating DocMiral programmatically.


    Choosing the Right Variable Type

    A simple rule:

    Use MiniApps when structure matters.

    Example: Resume experiences.


    Use Type Defined Fields when input matters.

    Example: Agreement text or comments.


    Use Generic Fields when flexibility matters.

    Example: API-generated inspection results.


    Decision Guide

    SituationRecommended Type
    Resume sectionMiniApp
    Long editable paragraphType Defined
    API data renderingGeneric
    Repeating structured entriesMiniApp
    One configurable inputType Defined
    Dynamic logic-heavy layoutGeneric

    Mixing Variable Types (Best Practice)

    A professional template often combines all three.

    Example resume template:

    • Personal info → MiniApp
    • Summary text → Type Defined field
    • API metadata → Generic fields

    This layered approach gives both usability and flexibility.


    Creator Tips

    Keep templates readable

    Group related variables together.

    Prefer MiniApps for reusable sections

    They reduce duplication across templates.

    Use Generic fields for advanced logic

    They give you full control when needed.

    Name fields clearly

    Good naming improves usability later.


    Final Thoughts

    DocMiral templates are designed to scale from simple documents to complex automated systems.

    By understanding these three variable types, you can build templates that are:

    • Easier for users to fill
    • More reusable
    • API-friendly
    • Future-proof

    Start simple, then progressively enhance your templates using MiniApps and typed fields as your document grows.

  • How to Create Templates in DocMiral: A Complete Guide

    Creating professional document templates in DocMiral is straightforward and powerful. Whether you’re building invoices, reports, certificates, or any other document type, this guide will walk you through the entire process.

    Getting Started

    To create a new template, navigate to your profile dashboard or templates list and click the Create New Template button. You’ll be taken to the template creation page where you’ll start by filling in the basic information:

    • Category – Organize your templates by type
    • Name – Give your template a descriptive name
    • Page Size – Choose from standard sizes (A4, Letter, etc.)
    • Orientation – Portrait or landscape

    Designing Your Template

    After setting up the basic info, you’ll enter the DocMiral Template Studio where the real magic happens. The studio provides a live coding environment where you can write HTML and Tailwind CSS while seeing an exact preview of how your document will look.

    Understanding Page Structures

    DocMiral supports two types of page structures to handle different content scenarios:

    1. Fixed Pages

    Perfect for content with a predictable length, such as cover pages, pitch slides, or forms. Fixed pages are exactly one page long.

    <div class="page">
      <!-- Your content here -->
    </div>
    

    Best for: Cover pages, certificates, business cards, single-page forms

    2. Flexible Pages

    Ideal when you can’t predict the content length. Flexible pages automatically create additional pages when content overflows.

    <div class="flexpage">
      <!-- Your dynamic content here -->
    </div>
    

    Best for: Invoices, reports, product lists, any multi-page documents

    Customizing Page Settings

    Fine-tune your template’s appearance with comprehensive page settings:

    • Page size and orientation
    • Margins and padding
    • Base font size
    • Default text color
    • Background color
    • And more…

    These settings ensure your documents look professional and consistent every time.

    Managing Images

    DocMiral includes a built-in Image Manager that hosts images directly for your templates. No need to worry about external hosting or broken links.

    To use images:

    1. Upload your images through the studio interface
    2. Click on any uploaded image to copy its URL
    3. Use the URL directly in your template’s HTML

    This feature makes it easy to include logos, icons, photos, and other visual elements in your templates.

    Adding Dynamic Variables

    The real power of DocMiral templates comes from variables. By defining which fields can be populated dynamically, you create reusable templates that can generate unlimited unique documents through the API, internal UI, or Tars AI.

    DocMiral uses Jinja2 templating syntax – a widely-adopted, easy-to-learn templating language.

    Variable Types

    Single Fields

    For simple text or numbers:

    <h1>Welcome, {{ name }}!</h1>
    <p>Total: ${{ amount }}</p>
    

    Dictionaries (Objects)

    For structured data:

    <p>{{ personal.name }}</p>
    <p>{{ personal.email }}</p>
    <p>{{ company.address }}</p>
    

    Lists (Arrays)

    For repeating content using loops:

    {% for item in items %}
      <div class="p-2">
        <p class="font-bold">{{ item.name }}</p>
        <p>Quantity: {{ item.qty }}</p>
        <p>Price: ${{ item.price }}</p>
      </div>
    {% endfor %}
    

    Coming Soon: Functions

    DocMiral is introducing Functions – a powerful new feature for easily adding:

    • Charts and graphs
    • Barcodes
    • QR codes
    • Shapes and diagrams
    • Other dynamic elements

    Functions will make it even easier to create rich, data-driven documents without manual coding.

    Tips for Success

    • Start simple: Begin with a basic layout and add complexity gradually
    • Use the preview: Take advantage of the live preview to see changes instantly
    • Test with real data: Use sample data to ensure your variables work correctly
    • Leverage Tailwind: Tailwind CSS provides powerful utility classes for rapid styling
    • Think responsive: Consider how your content will flow across multiple pages

    Ready to Get Started?

    Creating templates in DocMiral combines the flexibility of code with the convenience of a visual editor. Whether you’re a developer comfortable with HTML and CSS or a designer learning to code, DocMiral’s studio environment makes template creation accessible and efficient.

    Start creating your first template today and see how easy it is to turn your designs into dynamic, professional documents.


    Have questions or need help? Check out our documentation or reach out to our support team.