Category: How To

  • How to Create Professional Invoices Automatically

    create-an-invoice-template

    Introduction (Hook)

    If you’ve ever sent invoices regularly—whether as a freelancer, developer, or small business owner—you’ve probably repeated the same steps dozens (or hundreds) of times:

    • Copy an old invoice
    • Update client details
    • Adjust line items
    • Recalculate totals
    • Export to PDF
    • Send it

    It works… until it doesn’t.

    You start noticing small mistakes: wrong totals, outdated addresses, inconsistent formatting. And as your volume grows, this “simple task” becomes a bottleneck.

    This is exactly where automatic invoice creation becomes essential—not as a convenience, but as infrastructure.


    The Problem with Manual Invoicing

    Manual invoicing breaks down quickly as complexity increases.

    1. Repetitive Data Entry

    You repeatedly type:

    • Customer name and address
    • Product or service details
    • Pricing and quantities

    This is not just tedious—it’s error-prone.

    2. Calculation Mistakes

    Even small errors in:

    • Tax calculations
    • Discounts
    • Totals

    can create trust issues or require reissuing invoices.

    3. Inconsistent Formatting

    Over time, invoices diverge:

    • Different layouts
    • Missing fields
    • Misaligned branding

    This reduces professionalism.

    4. No Scalability

    Creating 2 invoices manually is fine.
    Creating 200 per month is not.


    What “Automatic Invoice Creation” Really Means

    Automatic invoicing is not about “auto-filling a PDF.”

    It’s about template-based document generation.

    Core Idea

    You define a template once, and then generate invoices by injecting data.

    Instead of:

    Editing documents manually

    You:

    Generate documents from structured data

    Example Concept

    <h1>Invoice #{{ data.invoice_number }}</h1>
    <p>Customer: {{ data.customer.name }}</p>{% for item in data.line_items %}
    <div>
    {{ item.description }} — {{ item.quantity }} × {{ item.price }}
    </div>
    {% endfor %}

    Here:

    • {{ data.customer.name }} is dynamic
    • {% for item in data.line_items %} handles multiple products

    This is the foundation of automation.


    Core Components of an Automated Invoice System

    To automate invoices properly, you need four key parts:

    1. Templates (HTML + Styling)

    A structured layout that defines:

    • Header (logo, business info)
    • Customer section
    • Line items table
    • Totals and taxes

    In DocMiral, templates are built using HTML + TailwindCSS with dynamic variables.


    2. Data Inputs

    Structured data replaces manual typing:

    {
    "customer": {
    "name": "John Smith",
    "address": "London, UK"
    },
    "line_items": [
    { "description": "Web Development", "quantity": 10, "price": 50 }
    ]
    }

    3. Reusable Data Sources

    Instead of re-entering:

    • Customers
    • Products
    • Pricing

    You store them once and reuse them.

    DocMiral uses Buckets for this—shared data stores for things like customer lists or product catalogs.


    4. Logic (Totals, Taxes, Formatting)

    Automation includes:

    • Subtotals
    • VAT / tax rules
    • Currency formatting

    Example:

    {{ priceformat(item.quantity * item.price) }}

    Step-by-Step Example Workflow

    Let’s walk through a simple automated invoice flow.

    Step 1 — Create a Template

    Define the layout:

    <h1>Invoice</h1>
    <p>{{ data.business.name }}</p>
    <p>{{ data.customer.name }}</p>

    Step 2 — Add Dynamic Fields

    {{ data.invoice_number }}
    {{ data.date }}
    {{ data.due_date }}

    Step 3 — Add Line Item Loop

    {% for item in data.line_items %}
    <tr>
    <td>{{ item.description }}</td>
    <td>{{ item.quantity }}</td>
    <td>{{ item.price }}</td>
    </tr>
    {% endfor %}

    Step 4 — Provide Data

    Two approaches:

    Manual (UI form)

    Fill structured fields like:

    • Customer
    • Products
    • Dates

    Programmatic (API)

    POST /generate-invoice
    {
    "template_id": "invoice_001",
    "data": { ... }
    }

    Step 5 — Generate Output

    The system produces:

    • PDF
    • Image
    • or other formats

    No manual editing required.


    Advanced Automation Use Cases

    Once the foundation is in place, automation becomes powerful.

    1. Generate Invoices via API

    Trigger invoice creation:

    • After a payment
    • After a purchase
    • From your backend system

    2. Recurring Invoices

    Automatically generate:

    • Monthly retainers
    • Subscription invoices

    No human involvement.


    3. Use Stored Data

    Select:

    • Existing customers
    • Saved products

    instead of typing.


    4. AI-Assisted Input

    Instead of structured JSON, you can say:

    “Create an invoice for John, 5 hours of consulting at £100/hour”

    AI fills the fields automatically.

    DocMiral’s TARS assistant supports this kind of input and maps it to structured data.


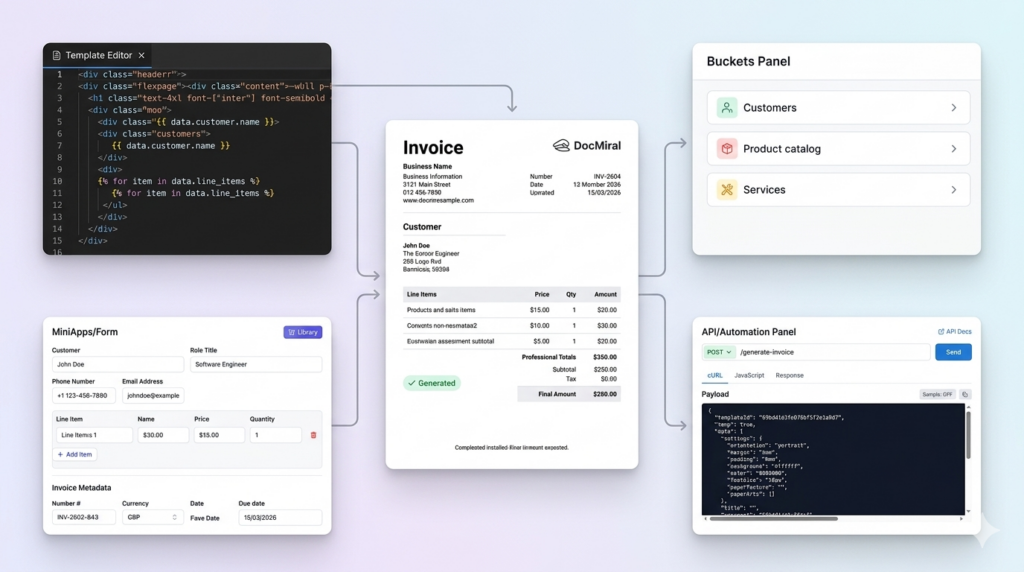
    How DocMiral Enables This

    DocMiral provides all building blocks in one system:

    HTML + Tailwind Templates

    You control layout at code level with full flexibility.


    MiniApps (Structured Inputs)

    Instead of raw JSON, you get UI sections like:

    • Business info
    • Customer info
    • Products

    These map directly to template variables.


    Buckets (Reusable Data)

    Store:

    • Customer lists
    • Product catalogs

    Reuse across documents.


    API-Based Generation

    Generate invoices programmatically using API tokens:

    Authorization: Bearer <token>

    TARS AI Assistant

    • Fill invoices from natural language
    • Extract data from files
    • Modify templates

    Real Example: Invoice Structure

    A typical automated invoice includes:

    1. Business Info

    {{ data.business.name }}
    {{ data.business.address }}

    2. Customer Info

    {{ data.customer.name }}
    {{ data.customer.email }}

    3. Line Items

    {% for item in data.line_items %}
    {{ item.description }}
    {{ item.quantity }}
    {{ item.price }}
    {% endfor %}

    4. Totals

    Subtotal: {{ data.subtotal }}
    VAT: {{ data.tax }}
    Total: {{ data.total }}

    Each section is fully dynamic—no hardcoded values.


    Manual vs Automated Workflow

    StepManualAutomated
    Create invoiceCopy & editGenerate
    Add dataType manuallyInject data
    Calculate totalsManualAutomatic
    FormatInconsistentStandardized
    ScaleDifficultSeamless

    Conclusion

    Automatic invoice creation is not just about saving time—it’s about:

    • Consistency → every invoice looks correct
    • Accuracy → no calculation errors
    • Scalability → generate thousands if needed

    For developers, it becomes part of your system.
    For freelancers, it removes repetitive work.
    For businesses, it standardizes operations.

    Once you switch from “editing documents” to “generating documents,” invoicing stops being a task—and becomes a process.

  • From Prompt to Template: Creating Document Layouts with AI

    Designing document templates has traditionally been a slow, technical process.

    You sketch a layout, write HTML code, define variables, test the data structure, tweak the layout again, export a PDF, and repeat. For many developers and teams, this process can take hours — sometimes days — before a template becomes reusable.

    But what if you could skip most of that process and start with a simple prompt?

    With DocMiral’s Smart AI Builder, you can describe the document you want in plain language, and the system will generate a complete template layout — including fields, structure, and design.

    This article walks through how that works using a real example.


    The Problem: Document Templates Are Harder Than They Look

    When teams need automated documents — invoices, reports, contracts, meeting minutes — they usually face two challenges:

    1. Designing a professional layout
    2. Defining the dynamic data structure

    A document template isn’t just static HTML. It needs:

    • dynamic fields
    • lists and tables
    • reusable structure
    • consistent layout
    • PDF-friendly formatting

    For example, a board meeting minutes document might include:

    • meeting metadata
    • attendees and absentees
    • agenda items
    • discussion notes
    • action items

    Each of those pieces needs its own structure.

    Traditionally, developers had to build this manually.

    DocMiral approaches this differently.


    The Idea: Describe the Document Instead of Coding It

    With the Smart Builder, you simply describe the document you want.

    For example:

    “Create a professional board meeting minutes document template with a clean corporate layout. Include a header with company name, meeting title, date, time, location, and chairperson, followed by sections for attendees and absentees. Add an agenda and discussion section where each topic includes presenter, notes, and decisions. Include an action items table with task, responsible person, deadline, and status. The design should be simple, well-structured, A4 friendly, and use subtle separators and clear hierarchy so it looks professional when exported to PDF.”

    This single prompt contains everything the system needs to generate the template.


    Step 1 — Writing the Prompt

    In the Smart Builder interface, the user first selects a document category and then describes the document they want.

    template-create-by-ai-step1-get-prompt

    The description doesn’t need to be technical. It just needs to explain:

    • what sections the document has
    • what information each section contains
    • the overall style or layout

    For example:

    • professional
    • minimal
    • A4 friendly
    • clear hierarchy
    • corporate style

    These cues help the AI understand how to design the template.


    Step 2 — Understanding the Request

    Once the prompt is submitted, DocMiral first determines what the user wants to do.

    Is the user:

    • creating a template
    • filling a template
    • customizing an existing template
    • doing both creation and filling?
    template-create-by-ai-step-prompt-intent-resolver

    In this case, the system detects:

    Create Template

    That means it will design a new template from scratch based on the description.

    This is part of DocMiral’s AI pipeline that interprets user intent before any generation begins.


    Step 3 — Planning the Template Structure

    After understanding the request, the system analyzes the prompt and extracts the document structure.

    For our meeting minutes example, the AI identifies fields such as:

    • company name
    • meeting title
    • date and time
    • meeting location
    • chairperson
    • attendees
    • absentees
    • agenda items
    • discussion notes
    • action items
    template-create-by-ai-step-panningtemplate

    The system also decides what kind of structure each field should use.

    For example:

    SectionData Structure
    AttendeesList
    Agenda topicsList
    Discussion notesList
    Action itemsTable

    This step transforms a natural language description into a structured template schema.


    Step 4 — Generating the Template Fields

    Next, the system generates the variables that will appear in the template.

    For example:

    • header fields
    • lists of agenda topics
    • tables for action items
    • metadata fields for meeting details
    template-create-by-ai-step-define-template-fields

    DocMiral templates support multiple variable types including:

    • structured MiniApp data
    • typed input fields
    • flexible Jinja2 variables

    These variables allow documents to adapt to different data while keeping the layout consistent.

    Want to know more about DocMiral variables system?


    Step 5 — Generating the Document Layout

    After defining the data structure, the AI generates the actual document layout.

    The layout is created using:

    • HTML
    • TailwindCSS
    • DocMiral template variables

    The design follows the constraints described in the prompt:

    • A4 page format
    • clear hierarchy
    • subtle separators
    • professional corporate layout

    The result is a ready-to-use template.


    The Result: A Fully Functional Template

    Once the pipeline finishes, DocMiral produces a working document template that can immediately be used to generate documents.

    You can then open it in the document editor, fill the fields, and export the final document.

    When the template is opened in the editor, users can:

    • fill fields using structured forms
    • preview the document in real time
    • export to PDF
    • modify the design with AI

    Why This Workflow Matters

    The Smart Builder workflow changes how templates are created.

    Instead of designing first and structuring data later, the system does both simultaneously.

    That means users can move from:

    idea → working template

    in seconds.

    This approach is especially useful for:

    Developers

    who want to quickly create document generation templates for their applications.

    Startups

    who need invoices, reports, or contracts without building complex template systems.

    Teams

    who regularly generate structured documents like meeting notes or reports.


    A Real Example: Meeting Minutes

    Using the earlier prompt, DocMiral automatically creates a document with:

    • a clean header for meeting metadata
    • attendee and absentee lists
    • structured agenda sections
    • discussion notes
    • a table for action items

    The layout is already optimized for PDF export, which means it prints cleanly on A4 pages without manual adjustments.


    Learn More About the Smart Builder

    If you’d like to explore the feature in detail, see the official guide:

    Using the Smart AI Builder
    https://docmiral.com/features/templates/create-pdf/using-smart-ai-builder

    The guide explains how the system turns prompts into templates and how to use the builder effectively.


    Conclusion

    AI is changing how documents are created.

    Instead of spending hours designing templates and defining fields manually, you can now describe what you want and let the system generate the structure for you.

    DocMiral’s Smart Builder bridges the gap between natural language and document automation — allowing anyone to turn an idea into a working document template.

    And as templates become easier to create, document workflows become easier to automate.

  • How to Add Variables to Your DocMiral Templates (Complete Guide for Creators)

    Creating powerful templates in DocMiral is not just about design. The real magic happens when your template becomes dynamic — able to accept data, adapt to users, and generate documents automatically.

    To make this possible, DocMiral templates support three types of variables. Each serves a different purpose and gives you a different level of control.

    In this guide, you will learn when and how to use:

    • MiniApp Fields
    • Type Defined Fields
    • Generic Fields

    You do not need to understand backend data structures or schemas. Everything here focuses on what matters to template creators: writing templates effectively.


    The Big Picture

    Think of template variables as three levels of intelligence:

    Variable TypeBest ForUI SupportComplexity
    MiniApp FieldsStructured sectionsDedicated UIAdvanced
    Type Defined FieldsSingle controlled inputsBuilt-in field UIMedium
    Generic FieldsFlexible API dataNo UI requiredSimple

    Choose the one that matches how structured your data needs to be.


    1. MiniApp Fields (Structured Sections)

    MiniApps are the most powerful type of variable.

    They connect your template to a dedicated editing interface designed for a specific document section.

    Instead of manually defining many fields, you reference a ready-made data editor.

    When to Use MiniApps

    Use MiniApps when:

    • A section has multiple related fields
    • Users need a guided UI
    • Data may repeat (lists)
    • The structure is reusable across templates

    Typical examples:

    • Resume personal details
    • Work experiences
    • Education history
    • Invoice items
    • Inspection reports

    Accessing MiniApp Data

    MiniApp fields use the mini() directive.


    Object Example

    {{ mini(name='resumes/personal', key='name') }}

    This pulls a single value from the Resume Personal MiniApp.

    Example output:

    John Doe

    List Example

    MiniApps can also return lists.

    {% for item in mini(
    name="resumes/experiences",
    items=["title", "company", "date_start", "date_end"]
    ) %}

    Inside the loop:

    {{ item.title }}
    {{ item.company }}
    {{ item.date_start }}
    {{ item.date_end }}

    This automatically renders multiple experience entries added by the user.


    Why MiniApps Are Powerful

    You get:

    • Structured editing UI
    • Consistent data format
    • Cleaner templates
    • Reusable sections across templates

    Instead of designing inputs yourself, you reuse intelligent components.


    2. Type Defined Fields (Smart Inputs)

    Sometimes you only need one field, not a full MiniApp.

    That’s where Type Defined Fields come in.

    They allow you to declare a field and specify how it should behave.


    Using the text() Directive

    Example:

    {{ text(
    name='agreement_text',
    title='Agreement Text',
    type='smarteditor'
    ) }}

    This creates:

    • A named variable
    • A labeled input
    • A specific editor type

    When to Use Type Defined Fields

    Use them for:

    • Agreements
    • Descriptions
    • Notes
    • Custom paragraphs
    • Checkboxes
    • Dates
    • Dropdown selections

    Essentially, any single configurable input.


    Benefits

    • No UI coding required
    • Consistent input behavior
    • Cleaner creator experience
    • Controlled data format

    You define intent, DocMiral handles the interface.


    3. Generic Fields (Pure Template Variables)

    Generic fields are the simplest and most flexible option.

    They use standard Jinja-style variables.

    Perfect for:

    • API users
    • Automation workflows
    • Fully custom data sources

    Simple Variables

    {{ name }}

    or nested:

    {{ client.name }}

    Lists

    {% for item in items %}
    {{ item }}
    {% endfor %}

    Complex Example

    {% set result = data.report_info.inspection_result|lower %}
    <span class="
    {% if result == 'pass' %} bg-green-600
    {% elif result == 'hold' %} bg-yellow-500
    {% elif result == 'fail' %} bg-red-600
    {% else %} bg-gray-500
    {% endif %}
    ">
    {{ data.report_info.inspection_result }}
    </span>

    This allows full logic control inside templates.


    When to Use Generic Fields

    Choose generic fields when:

    • Data comes from APIs
    • You want maximum flexibility
    • No built-in UI is required
    • You already control the data structure

    They are especially popular among developers integrating DocMiral programmatically.


    Choosing the Right Variable Type

    A simple rule:

    Use MiniApps when structure matters.

    Example: Resume experiences.


    Use Type Defined Fields when input matters.

    Example: Agreement text or comments.


    Use Generic Fields when flexibility matters.

    Example: API-generated inspection results.


    Decision Guide

    SituationRecommended Type
    Resume sectionMiniApp
    Long editable paragraphType Defined
    API data renderingGeneric
    Repeating structured entriesMiniApp
    One configurable inputType Defined
    Dynamic logic-heavy layoutGeneric

    Mixing Variable Types (Best Practice)

    A professional template often combines all three.

    Example resume template:

    • Personal info → MiniApp
    • Summary text → Type Defined field
    • API metadata → Generic fields

    This layered approach gives both usability and flexibility.


    Creator Tips

    Keep templates readable

    Group related variables together.

    Prefer MiniApps for reusable sections

    They reduce duplication across templates.

    Use Generic fields for advanced logic

    They give you full control when needed.

    Name fields clearly

    Good naming improves usability later.


    Final Thoughts

    DocMiral templates are designed to scale from simple documents to complex automated systems.

    By understanding these three variable types, you can build templates that are:

    • Easier for users to fill
    • More reusable
    • API-friendly
    • Future-proof

    Start simple, then progressively enhance your templates using MiniApps and typed fields as your document grows.

  • How ATS Works (And Why Your Resume Might Never Be Seen)

    If you have ever applied for a job and never heard back, it may not be because you were unqualified.

    It may be because a machine never understood your resume.

    That machine is called an Applicant Tracking System, or ATS. Today, most medium and large companies use one as the first step in hiring.

    Let’s break down how ATS works in a clear, simple way so you know what actually happens after you click Apply.


    What Is an ATS?

    An Applicant Tracking System is software that companies use to:

    • Collect job applications
    • Store resumes in a searchable database
    • Filter candidates
    • Rank applicants
    • Manage the hiring workflow

    Instead of recruiters manually reviewing hundreds of resumes, the ATS organizes and narrows the list first.

    In many companies, a human does not see your resume unless the ATS passes it through.


    What Happens After You Submit Your Resume?

    Here is the typical process.

    1. Resume Upload

    You upload your resume as a PDF or Word document through a job portal or company website.

    The ATS immediately starts processing it.


    2. Parsing

    Parsing is the most important stage.

    The ATS reads your resume and tries to extract structured information such as:

    • Full name
    • Contact details
    • Work experience
    • Job titles
    • Employment dates
    • Skills
    • Education
    • Certifications

    It converts your document into organized fields inside its database.

    If your resume layout is confusing or overly designed, the system may:

    • Misread dates
    • Break apart job titles
    • Ignore bullet points
    • Miss keywords
    • Fail to extract information correctly

    If parsing fails, ranking fails.


    3. Keyword Matching

    After parsing, the ATS compares your resume to the job description.

    It looks for:

    • Required skills
    • Specific technologies
    • Certifications
    • Industry terminology
    • Relevant job titles

    For example, if a job description includes “Python, Django, REST APIs,” the system checks whether those terms appear in your resume.

    This is why alignment with the job description matters.


    4. Scoring and Filtering

    Many ATS platforms assign a relevance score based on:

    • Keyword match
    • Experience level
    • Education requirements
    • Location
    • Required qualifications

    Recruiters can then:

    • Sort candidates by score
    • Filter by required criteria
    • Search for specific keywords

    Only the strongest matches are typically reviewed manually.


    5. Human Review

    If your resume passes the automated filters, a recruiter sees:

    • Your structured profile
    • Your original resume file
    • Possibly a match score

    At this stage, clarity and professional presentation matter for a human reader.


    Why Some Resumes Fail ATS

    Many resumes fail not because of weak experience, but because of structural issues.

    Common mistakes include:

    Overly Complex Layouts

    Multi-column designs can confuse parsing systems.

    Text Embedded in Images

    If information is inside graphics, the ATS may not read it.

    Non-Standard Section Headings

    Creative headings instead of standard ones like “Work Experience” or “Education” can reduce clarity.

    Missing Keywords

    If your resume uses different terminology than the job description, it may rank lower.

    Heavy Use of Tables

    Some systems struggle with complex tables and nested formatting.


    What ATS Actually Prioritizes

    An ATS does not care about:

    • Decorative icons
    • Visual creativity
    • Unique fonts

    It prioritizes:

    • Clear structure
    • Logical chronology
    • Standard section names
    • Relevant keywords
    • Clean formatting

    Clarity is more important than design.


    Do All Companies Use ATS?

    Not every company uses an ATS, but most mid-sized and large organizations do.

    If you are applying through:

    • Corporate career pages
    • LinkedIn applications
    • Online job portals
    • Recruitment platforms

    There is a strong chance your resume is being processed by an ATS first.


    Want to Create an ATS-Friendly Resume?

    If you want to apply this knowledge in practice, you can use DocMiral’s ATS-friendly resume tool:

    https://docmiral.com/apps/resumes/generate-ats-friendly-resume

    It focuses on:

    • Structured resume sections
    • Clean, machine-readable formatting
    • Proper hierarchy
    • Keyword alignment support
    • Context-aware AI assistance to refine content

    The goal is simple: make sure your resume works with ATS systems, not against them.


    Final Thought

    Most candidates focus on making their resume look impressive.

    The real priority is making sure it is readable, structured, and aligned with the job description.

    Before your resume reaches a recruiter, it must first pass a system designed to filter.

    Once you understand how that system works, you can design your resume to work with it instead of against it.

  • Generate an ATS-Friendly Resume That Actually Gets Seen

    Most resumes don’t fail because of weak experience.
    They fail because Applicant Tracking Systems (ATS) never properly read them.

    If your CV isn’t parsed correctly, it won’t reach a human — no matter how strong your background is.

    That’s exactly why we built:

    👉 ATS Resume Generator on DocMiral

    https://docmiral.com/apps/resumes/generate-ats-friendly-resume


    What Is an ATS-Friendly Resume?

    An ATS-friendly resume is designed to:

    • Be machine-readable
    • Use correct semantic structure
    • Avoid layout traps (tables, multi-columns, complex graphics)
    • Align keywords with job descriptions
    • Maintain clean hierarchy and predictable formatting

    Recruiters use ATS systems to filter candidates before any manual review happens.

    If your resume:

    • Uses design-heavy templates
    • Contains text inside images
    • Breaks hierarchy with random styling
    • Lacks keyword alignment

    It may never even be opened.


    Why Most Resume Builders Get It Wrong

    Many tools focus on design first.

    ATS systems don’t care about:

    • Decorative icons
    • Fancy layouts
    • Over-designed columns

    They care about:

    • Structure
    • Clarity
    • Keyword matching
    • Consistency

    DocMiral approaches resume creation from a structured document architecture perspective, not just visual design.


    How DocMiral Builds ATS-Safe Resumes

    1. Structured Resume Engine (Not Just a Form)

    Your resume isn’t a free-text blob.

    It’s built through structured sections:

    • Personal info
    • Work experience
    • Education
    • Skills
    • Certifications
    • Projects

    Each section is internally structured for ATS compatibility and predictable parsing.

    This means:

    • Clean heading hierarchy
    • Standardized field naming
    • Consistent formatting
    • Export-ready PDF

    2. Buckets: Reusable Career Data

    One of DocMiral’s most powerful features is Buckets.

    Instead of rewriting your information every time:

    • Store work experiences
    • Store skill sets
    • Store achievements
    • Store certifications

    Then reuse them across multiple resumes.

    This is extremely useful when:

    • Applying to different roles
    • Customizing resumes for different industries
    • Creating tailored CVs quickly

    You don’t rebuild.
    You compose.

    Learn more about features:
    https://docmiral.com/features


    3. Tars — Context-Aware AI Resume Assistant

    Unlike generic AI chat tools, Tars understands your document structure.

    Tars can:

    • Help rewrite bullet points
    • Optimize achievements with measurable impact
    • Improve keyword density
    • Suggest stronger action verbs
    • Align resume content with job descriptions

    But here’s the important part:

    Tars is context-aware of your resume sections.

    It doesn’t generate random text.
    It improves the structured content inside your resume.

    This keeps:

    • Consistency
    • Professional tone
    • ATS compliance intact

    4. Designed for Real Job Markets

    Whether you’re applying in:

    • UK
    • EU
    • US
    • Remote global roles

    The resume structure remains ATS-compatible and recruiter-friendly.

    DocMiral focuses on:

    • Clean typography
    • Logical flow
    • Export-ready PDF output
    • Professional presentation without ATS risk

    Who Should Use This Tool?

    • Developers applying to tech roles
    • Professionals switching industries
    • Students creating first CVs
    • Remote job applicants
    • Anyone tired of resumes disappearing into black holes

    Especially useful if you:

    • Apply frequently
    • Customize resumes per job
    • Want reusable structured data
    • Care about technical correctness

    SEO Keywords This Tool Helps With

    This tool aligns with high-intent searches such as:

    • ATS friendly resume generator
    • Create ATS compliant resume
    • Resume builder for applicant tracking system
    • How to pass ATS resume screening
    • Resume format for ATS
    • ATS resume template PDF

    DocMiral is built around solving that exact job-to-be-done.


    Why DocMiral Is Different From Traditional Resume Builders

    Most resume tools:

    • Focus on design templates
    • Export static PDFs
    • Don’t offer reusable structured data
    • Offer generic AI writing help

    DocMiral offers:

    ✔ Structured document architecture
    ✔ Reusable Buckets
    ✔ Context-aware AI assistant (Tars)
    ✔ ATS-first formatting
    ✔ Clean export output
    ✔ Modular mini-app architecture

    It’s not just a resume builder.

    It’s a document system.


    How to Create an ATS-Friendly Resume in DocMiral

    1. Open the tool:
      https://docmiral.com/apps/resumes/generate-ats-friendly-resume
    2. Fill structured sections.
    3. Use Buckets to import saved experiences.
    4. Use Tars to refine bullet points.
    5. Export ATS-safe PDF.

    Done.


    Final Thought

    The job market is competitive enough.

    Your resume shouldn’t fail because of formatting errors.

    An ATS-friendly resume isn’t about looking impressive.

    It’s about being readable, scannable, and structured correctly.

    DocMiral helps you build it the right way.

  • CIS Invoice Guide (UK) – Complete 2026 Guide for Subcontractors and Contractors

    If you work in UK construction, you already know this:

    CIS mistakes are expensive.

    One wrong calculation, one incorrect VAT base, one unclear labour/material split — and suddenly you’re dealing with rejected payments, accountant queries, or HMRC issues.

    This guide explains everything you need to know about CIS invoices in the UK, including:

    • What a CIS invoice actually is
    • What HMRC expects
    • How CIS deduction is calculated
    • How VAT interacts with CIS
    • Common mistakes to avoid
    • What a fully compliant CIS invoice should contain

    And at the end, you’ll see how to generate one properly without guesswork.


    What Is a CIS Invoice?

    A CIS invoice is a construction invoice issued under the UK Construction Industry Scheme (CIS).

    Under CIS:

    • The contractor deducts tax from a subcontractor’s labour payment
    • The deduction is sent to HMRC
    • The subcontractor receives the net amount

    Important:

    CIS is not VAT.
    CIS is not a separate tax.
    It is a tax withholding mechanism.

    The invoice must clearly support this deduction structure.


    Who Needs a CIS-Compliant Invoice?

    You need one if you are:

    • A subcontractor invoicing a contractor under CIS
    • A contractor reviewing and paying CIS invoices
    • An accountant preparing CIS-compliant documentation
    • A limited company or sole trader in construction

    If you issue standard invoices without separating labour and materials, your invoice is not truly CIS-safe.


    How CIS Deduction Works (The Core Rule)

    CIS deduction applies only to:

    • Labour
    • Plant hire with operator

    It does NOT apply to:

    • Materials
    • VAT
    • Most travel expenses
    • Plant hire without operator

    The formula:

    CIS deduction = Labour subtotal (ex VAT) × CIS rate
    

    Rates are:

    • 0% – Gross payment status
    • 20% – Verified subcontractor
    • 30% – Unverified subcontractor

    CIS status belongs to the subcontractor (verified via UTR), not the invoice.


    How VAT Works with CIS

    This is where most people make mistakes.

    CIS is calculated:

    • On labour only
    • Excluding VAT
    • Excluding materials

    VAT is calculated separately and added afterward.

    Correct order:

    1. Calculate labour subtotal (ex VAT)
    2. Apply CIS deduction to labour only
    3. Calculate VAT on VATable items
    4. Calculate total
    5. Subtract CIS deduction

    If you apply CIS to VAT-inclusive totals, it’s wrong.


    What a Proper CIS Invoice Must Include

    A compliant invoice should contain:

    Subcontractor details

    • Legal name
    • Address
    • UTR
    • VAT number (if registered)
    • CIS status

    Contractor details

    • Legal name
    • Address

    Invoice details

    • Invoice number
    • Invoice date
    • Work period
    • Project/site reference

    Financial breakdown

    • Labour subtotal (ex VAT)
    • Materials subtotal (ex VAT)
    • CIS rate
    • CIS deduction amount
    • VAT amount
    • Total including VAT
    • Net payable

    If any of these are missing, accountants will ask questions.


    Example: What a Structured CIS Invoice Looks Like

    [INSERT IMAGE HERE – Screenshot of the app summary section]

    Use your full-page screenshot and crop around:

    • Labour subtotal
    • Materials subtotal
    • CIS deduction line
    • VAT breakdown
    • Net payable

    This visual reinforces the structured breakdown.

    Alt text suggestion:

    Example of CIS-compliant invoice breakdown with labour subtotal, CIS deduction, VAT and net payable


    Common CIS Invoice Mistakes

    These are the most frequent problems:

    • Applying CIS to materials
    • Applying CIS to VAT
    • Not separating labour clearly
    • Not showing CIS rate
    • Missing UTR
    • Using generic invoice templates

    These mistakes delay payment more often than people realise.


    Why Generic Invoice Templates Are Risky

    Standard invoice templates:

    • Do not enforce labour classification
    • Do not enforce CIS logic
    • Allow manual override of totals
    • Do not show CIS base clearly

    A CIS invoice should not be manually calculated every time.

    It should be deterministic.


    How to Generate a CIS-Compliant Invoice Properly

    Instead of using spreadsheets or modifying a generic invoice template, you can use a dedicated CIS invoice generator.

    We built one specifically for UK construction:

    👉 https://docmiral.com/apps/invoices/generate-cis-compliant-construction-invoice-uk

    It enforces:

    • Labour/material split
    • Correct CIS base calculation
    • Correct VAT handling
    • Clear deduction breakdown
    • Audit-friendly layout

    How the CIS Invoice Tool Works

    [INSERT IMAGE HERE – Screenshot of the top section of the tool interface]

    Suggested crop:

    • Form sections
    • Subcontractor info
    • Contractor info
    • Line items

    Alt text:

    CIS invoice generator interface showing subcontractor details, contractor details and line item classification

    Steps:

    1. Enter subcontractor and contractor details
    2. Add classified line items (labour, materials, etc.)
    3. The system calculates:
      • Labour subtotal
      • CIS base
      • CIS deduction
      • VAT
      • Net payable
    4. Download the compliant invoice

    No manual formula checking required.


    FAQ – CIS Invoices (UK)

    Does CIS apply to materials?

    No. CIS applies only to labour (and plant hire with operator).

    Does CIS apply to VAT?

    No. CIS is calculated excluding VAT.

    Who deducts CIS?

    The contractor deducts and pays HMRC.

    Can CIS rate change?

    Yes, if HMRC changes subcontractor verification status.

    Do I need to show UTR on invoice?

    Yes, it is strongly recommended and often expected.


    Final Thoughts

    CIS invoices are not complicated.

    But they are precise.

    The difference between a normal invoice and a CIS-compliant one is structure, clarity, and correct calculation order.

    If you work in UK construction, don’t rely on memory or manual maths.

    Use a system that enforces the rules.

    You can generate a CIS-compliant invoice here:

    https://docmiral.com/apps/invoices/generate-cis-compliant-construction-invoice-uk

  • How to Create Templates in DocMiral: A Complete Guide

    Creating professional document templates in DocMiral is straightforward and powerful. Whether you’re building invoices, reports, certificates, or any other document type, this guide will walk you through the entire process.

    Getting Started

    To create a new template, navigate to your profile dashboard or templates list and click the Create New Template button. You’ll be taken to the template creation page where you’ll start by filling in the basic information:

    • Category – Organize your templates by type
    • Name – Give your template a descriptive name
    • Page Size – Choose from standard sizes (A4, Letter, etc.)
    • Orientation – Portrait or landscape

    Designing Your Template

    After setting up the basic info, you’ll enter the DocMiral Template Studio where the real magic happens. The studio provides a live coding environment where you can write HTML and Tailwind CSS while seeing an exact preview of how your document will look.

    Understanding Page Structures

    DocMiral supports two types of page structures to handle different content scenarios:

    1. Fixed Pages

    Perfect for content with a predictable length, such as cover pages, pitch slides, or forms. Fixed pages are exactly one page long.

    <div class="page">
      <!-- Your content here -->
    </div>
    

    Best for: Cover pages, certificates, business cards, single-page forms

    2. Flexible Pages

    Ideal when you can’t predict the content length. Flexible pages automatically create additional pages when content overflows.

    <div class="flexpage">
      <!-- Your dynamic content here -->
    </div>
    

    Best for: Invoices, reports, product lists, any multi-page documents

    Customizing Page Settings

    Fine-tune your template’s appearance with comprehensive page settings:

    • Page size and orientation
    • Margins and padding
    • Base font size
    • Default text color
    • Background color
    • And more…

    These settings ensure your documents look professional and consistent every time.

    Managing Images

    DocMiral includes a built-in Image Manager that hosts images directly for your templates. No need to worry about external hosting or broken links.

    To use images:

    1. Upload your images through the studio interface
    2. Click on any uploaded image to copy its URL
    3. Use the URL directly in your template’s HTML

    This feature makes it easy to include logos, icons, photos, and other visual elements in your templates.

    Adding Dynamic Variables

    The real power of DocMiral templates comes from variables. By defining which fields can be populated dynamically, you create reusable templates that can generate unlimited unique documents through the API, internal UI, or Tars AI.

    DocMiral uses Jinja2 templating syntax – a widely-adopted, easy-to-learn templating language.

    Variable Types

    Single Fields

    For simple text or numbers:

    <h1>Welcome, {{ name }}!</h1>
    <p>Total: ${{ amount }}</p>
    

    Dictionaries (Objects)

    For structured data:

    <p>{{ personal.name }}</p>
    <p>{{ personal.email }}</p>
    <p>{{ company.address }}</p>
    

    Lists (Arrays)

    For repeating content using loops:

    {% for item in items %}
      <div class="p-2">
        <p class="font-bold">{{ item.name }}</p>
        <p>Quantity: {{ item.qty }}</p>
        <p>Price: ${{ item.price }}</p>
      </div>
    {% endfor %}
    

    Coming Soon: Functions

    DocMiral is introducing Functions – a powerful new feature for easily adding:

    • Charts and graphs
    • Barcodes
    • QR codes
    • Shapes and diagrams
    • Other dynamic elements

    Functions will make it even easier to create rich, data-driven documents without manual coding.

    Tips for Success

    • Start simple: Begin with a basic layout and add complexity gradually
    • Use the preview: Take advantage of the live preview to see changes instantly
    • Test with real data: Use sample data to ensure your variables work correctly
    • Leverage Tailwind: Tailwind CSS provides powerful utility classes for rapid styling
    • Think responsive: Consider how your content will flow across multiple pages

    Ready to Get Started?

    Creating templates in DocMiral combines the flexibility of code with the convenience of a visual editor. Whether you’re a developer comfortable with HTML and CSS or a designer learning to code, DocMiral’s studio environment makes template creation accessible and efficient.

    Start creating your first template today and see how easy it is to turn your designs into dynamic, professional documents.


    Have questions or need help? Check out our documentation or reach out to our support team.