
A step-by-step tutorial for creating your first DocMiral template.
Introduction
Developers often generate documents using a mix of:
- HTML-to-PDF libraries
- static PDF templates
- server-side string replacements
- fragile table layouts
This works at first, but quickly becomes difficult when documents become dynamic.
For example, imagine generating:
- invoices
- reports
- resumes
- contracts
- meeting minutes
These documents usually contain:
- repeating sections (tables, lists)
- optional blocks
- dynamic values
- different layouts depending on data
Modern document platforms solve this problem by turning documents into dynamic templates.
Instead of generating PDFs manually, you create HTML templates with placeholders, then inject data using APIs.
In this tutorial you’ll learn how to create your first dynamic document template using HTML + TailwindCSS in DocMiral.
We’ll build a Git Contributions Report template step-by-step and connect it to the API.
What Is DocMiral?
DocMiral is a document automation platform that allows developers to:
- design document templates with HTML + TailwindCSS
- add dynamic variables
- generate documents using APIs
- automate document workflows
Templates can include:
- Typed Inputs — structured fields (text, numbers, images, charts)
- Generic Variables — flexible data structures
- MiniApps — structured UI components for complex sections
These variables automatically generate a schema used when building documents through the API.
Read More About DocMiral Supported Variables
Step 1 — Create a New Template
First open the Template Creator.
Here you can choose between two creation modes:
- Code Studio — build templates manually using HTML and TailwindCSS
- AI Builder — describe the template and let AI generate it
For developers, Code Studio gives full control.
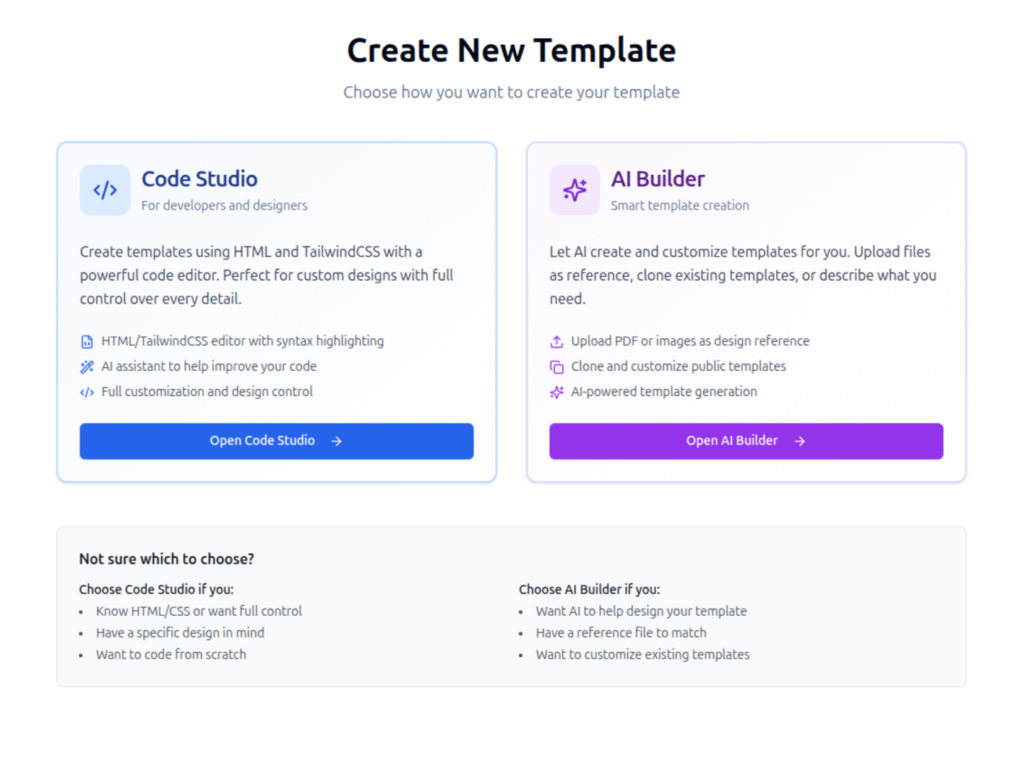
This screen appears when creating a new template.
Click Open Code Studio.
Step 2 — Define Template Settings
Before opening the editor you define basic template settings:
- category
- template name
- page size
- page orientation
For this tutorial we create:
Template name: Git Contributions Report
Category: Reports
Page size: A4
Orientation: Portrait
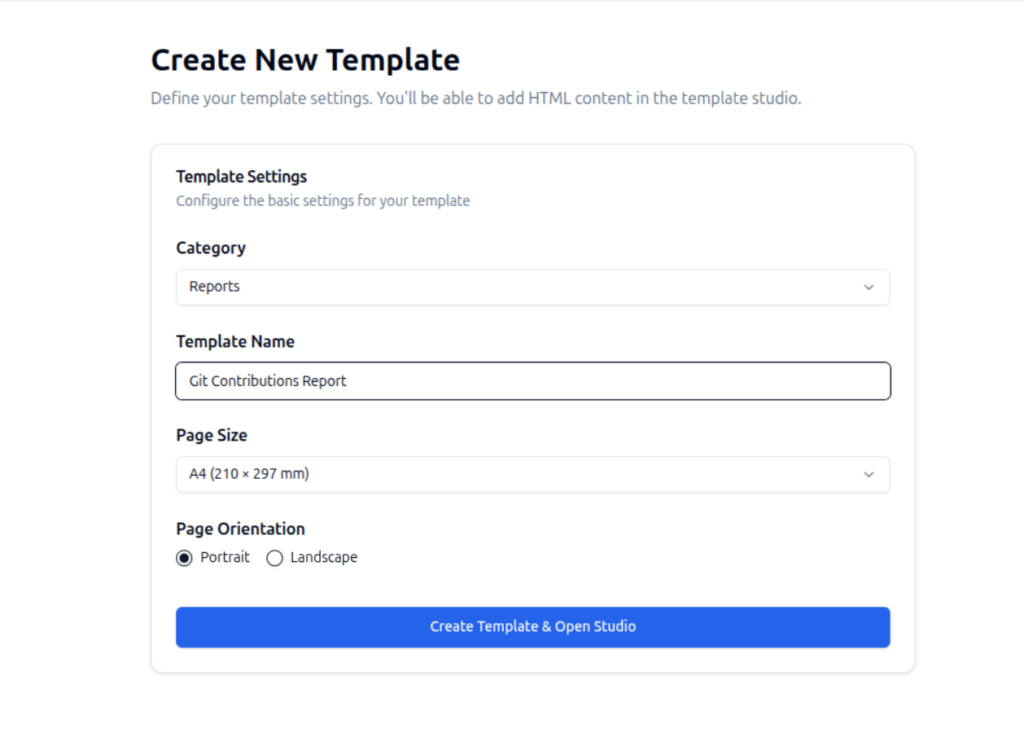
After clicking Create Template & Open Studio, the template editor opens.
Step 3 — Understanding the Template Studio
The Template Studio contains several important panels.
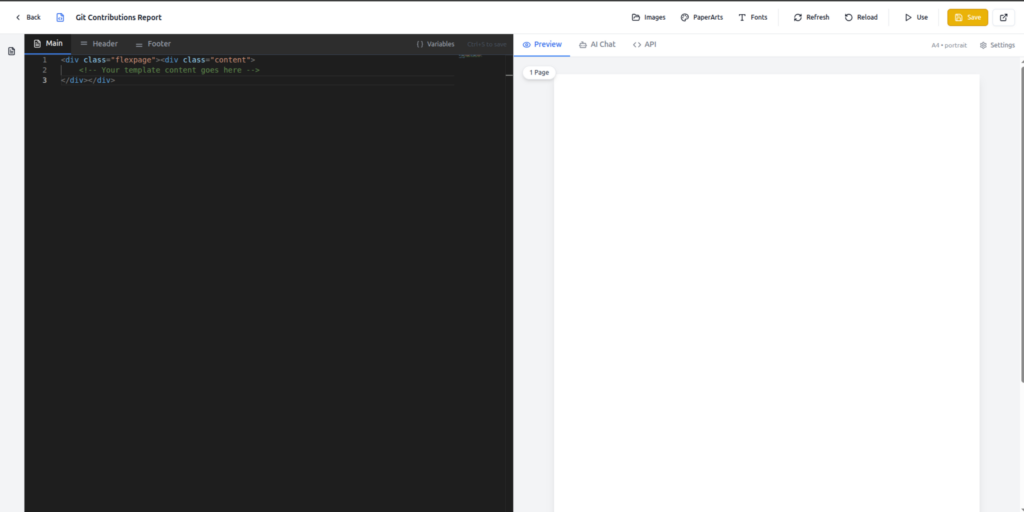
Key areas:
1. Code Editor
Write your template using:
HTML
TailwindCSS
Jinja2 templating
2. Live Preview
Displays the rendered document in real time.
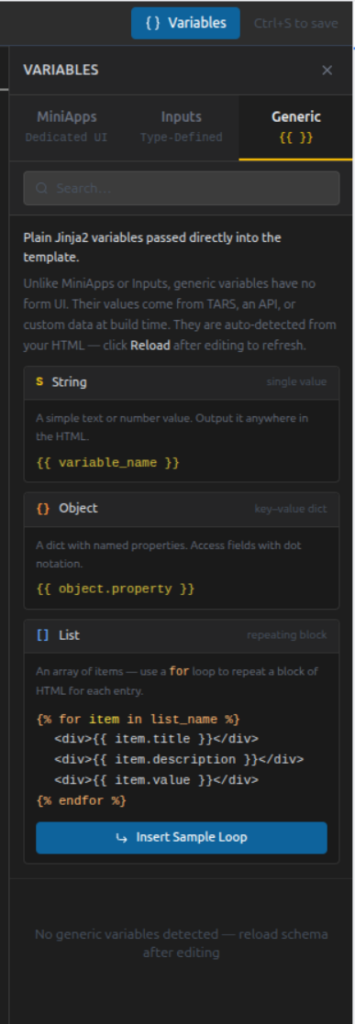
3. Variables Panel
Shows detected variables from your template.
4. API Tab
Displays the API endpoint and schema for generating documents.
5. AI Chat
Allows AI to help modify templates.
Step 4 — Start With a Flexible Page
DocMiral supports two page types:
Fixed Page
<div class="page">Used for precise layouts.
Flexible Page
<div class="flexpage">Used for documents with dynamic length.
Our report uses a flexible page.
Start the template with:
<div class="flexpage">
  <div class="content">
    <!-- Your template content goes here -->
  </div>
</div>
Step 5 — Add Typed Inputs
Typed inputs are structured variables declared directly inside the template.
Example:
{{ input(name='report_title', title='Report Title', type='string') }}This automatically creates:
- a field in the editor UI
- a schema entry
- a variable accessible in the template
Supported types include:
- string (Normal input text)
- number
- Date
- price (formatted like price)
- textarea (Multi-line text like a personal summary box)
- editor (A text area with editor-formatting capabilities)
- smarteditor (An editor with text-template features)
- image
- qrcode
- barcode
- chart
Example inside the header:
<h1 class="text-3xl font-semibold border-b-4 border-blue-700 pb-2 mb-4">
  {{ input(name='report_title', title='Report Title', type='string') }}
</h1>
This creates a field called Report Title.
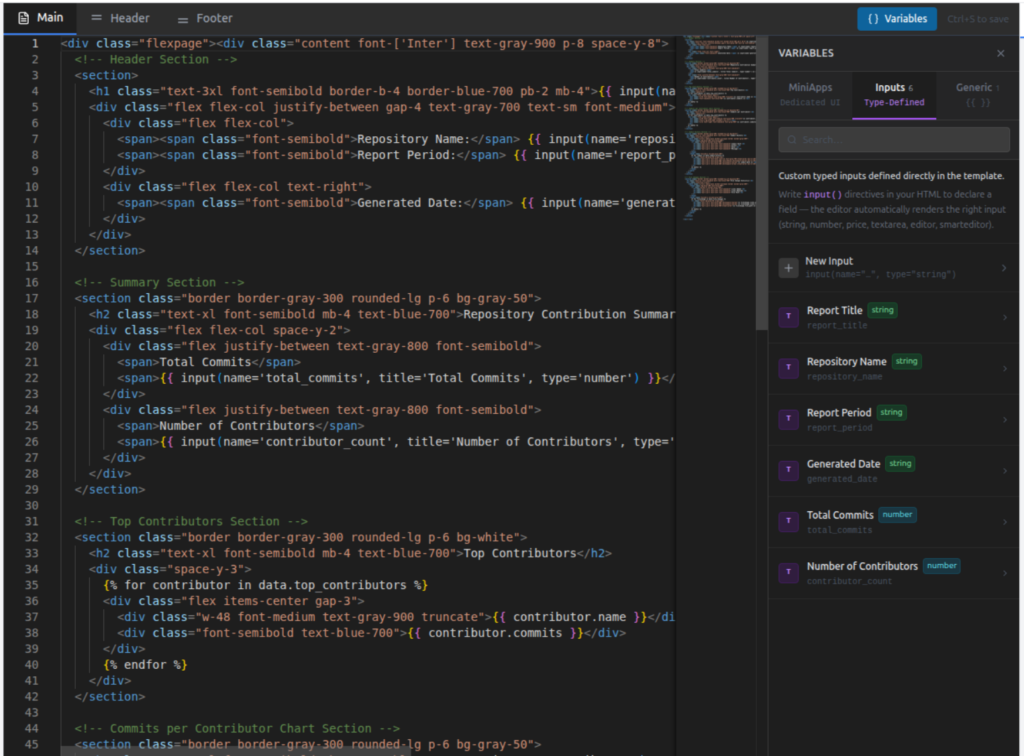
The variables panel automatically lists these inputs.
Step 6 — Use Generic Data Variables
Not all document data should be predefined fields.
Sometimes you want flexible data structures like:
- lists
- objects
- arrays
These are handled using Jinja2 variables.
Example:
{{ data.repository_name }}Lists can be rendered using loops:
{% for contributor in data.top_contributors %}
  <div>{{ contributor.name }}</div>
{% endfor %}
DocMiral automatically detects these variables and includes them in the template schema.
Step 7 — Create Dynamic Lists
The Git report includes dynamic sections such as:
Top Contributors
{% for contributor in data.top_contributors %}
<div class="flex items-center gap-3">
  <div class="w-48 font-medium text-gray-900 truncate">
    {{ contributor.name }}
  </div>  <div class="font-semibold text-blue-700">
    {{ contributor.commits }}
  </div>
</div>
{% endfor %}
This loop generates one row per contributor.
Example input data:
top_contributors
  - Alice (45 commits)
  - Bob (32 commits)
  - Daniel (27 commits)
Step 8 — Build Dynamic Tables
Dynamic tables are common in documents.
Example for commit history:
{% for commit in data.commit_history %}
<tr>
  <td>{{ commit.hash }}</td>
  <td>{{ commit.author }}</td>
  <td>{{ commit.date }}</td>
  <td>{{ commit.message }}</td>
</tr>
{% endfor %}
Each item becomes a row.
This makes templates flexible for any dataset size.
Step 9 — Preview the Template
While editing, the Preview panel renders the template.
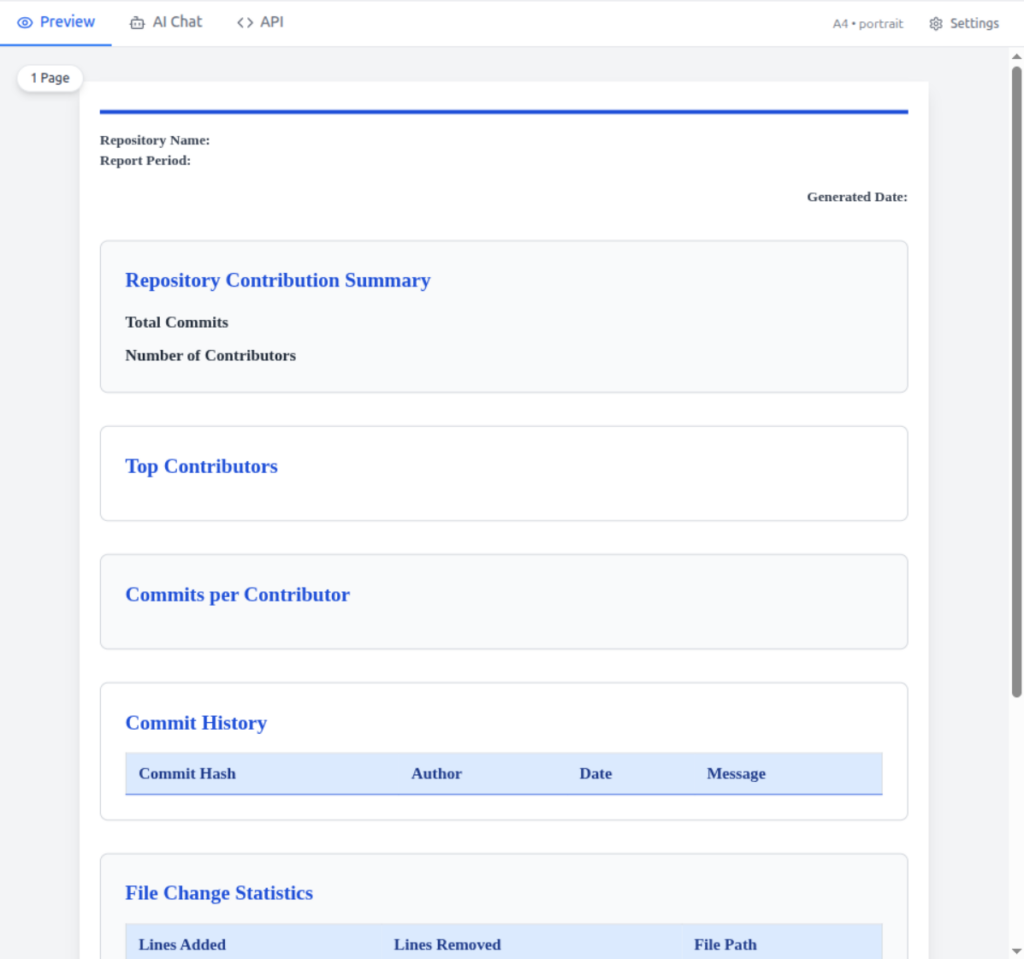
This helps you verify:
- spacing
- typography
- layout
- dynamic sections
Since DocMiral uses TailwindCSS, styling is applied directly through utility classes.
Step 10 — View the Generated Schema
After creating variables, DocMiral generates a schema used by the API.
Example schema snippet:
{
  "report_title": "",
  "repository_name": "",
  "report_period": "",
  "generated_date": "",
  "total_commits": 0,
  "contributor_count": 0,
  "data": {
    "top_contributors": [
      {
        "name": "",
        "commits": ""
      }
    ],

    ...

  }
}
This schema defines the expected input when generating documents.
Step 11 — Generate Documents Using the API
DocMiral automatically exposes an API endpoint for each template.
Example endpoint:
POST
https://api.docmiral.com/templates/{template_id}/build/pdf
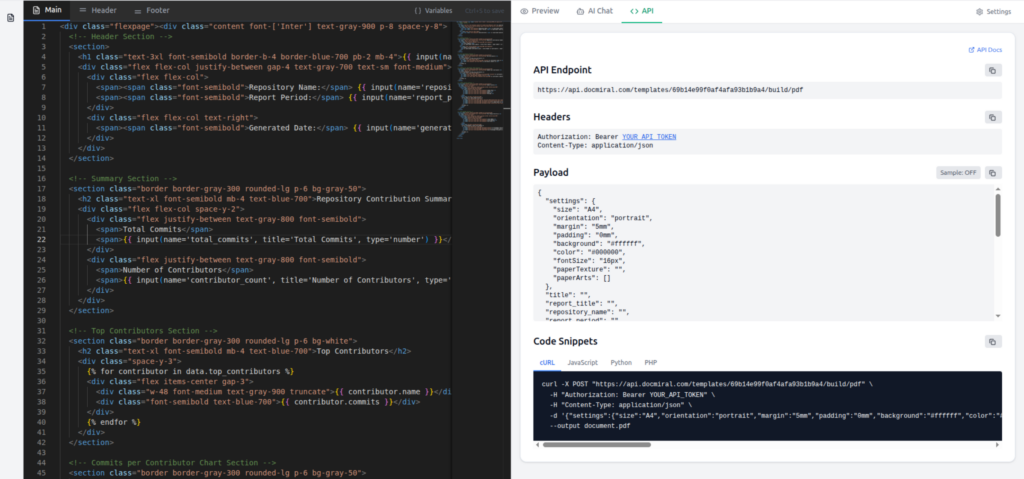
Example request:
curl -X POST \
https://api.docmiral.com/templates/{template_id}/build/pdf \
-H "Authorization: Bearer YOUR_API_TOKEN" \
-H "Content-Type: application/json"
Payload example:
{
  "report_title": "Git Contributions Report",
  "repository_name": "docmiral/api",
  "report_period": "Jan – Mar 2026",
  "generated_date": "2026-03-10",
  "total_commits": 143,
  "contributor_count": 7
}
The API generates a fully rendered PDF document.
Best Practices for Template Design
When creating templates:
Use Flex Layouts
Avoid rigid layouts that break with dynamic data.
Prefer Flexible Pages
flexpage
is best for most documents that have no pre-defined length.
Keep Sections Modular
Break documents into sections like:
- header
- summary
- tables
- charts
Avoid Hardcoded Values
Always use variables for data that might change.
Conclusion
Building document templates doesn’t need to be complicated.
With DocMiral you can:
- design documents using HTML + TailwindCSS
- add dynamic variables
- support complex data structures
- generate documents through APIs
The workflow becomes:
Design template → define variables → call API → generate documents
Once you understand this pattern, you can build templates for almost anything:
- invoices
- resumes
- contracts
- reports
- certificates
- proposals
And because templates are just HTML, developers can work with them using familiar tools.
Leave a Reply